Elections Player for XPression
- Frank Chan (Unlicensed)
- Alain Savoie
- Danny Ljubisic
Deprecated
The Elections Player for XPression application has been deprecated. Please use Elections Player for Chameleon instead.
The Elections Player for XPression is an output tool for Ross Video’s XPression graphics platform that outputs graphics using Elections database elements and the XPression API. The Elections Player is installed locally on the same system running XPression Studio as it uses an instance of the Ross XPression engine to run.
Using an agent called Gears for XPression, the Elections Player synchronizes graphics package data from XPression with available election data and rundown information in the Chameleon database. The Elections Player can output individual scenes or entire rundowns of ordered, scheduled scenes created in the Elections Rundown Builder module in Flow.
The Player uses specific naming conventions for the scenes (i.e., templates) in the XPression graphics package in tandem with object tags that are associated with each of the scene types to output the desired election results. For more information on the scene and object tag conventions, view the following page: Elections Player Tags.
Installation
The Elections Player for XPression application must be installed locally on the same system running the XPression Studio or BlueBox as it requires an instance of the XPression engine to work with.
Access Elections Player for XPression
To access the Elections Player for XPression, run it from its desktop icon on the XPression system.
Note: The version of the Elections Player for XPression installed must match the version of XPression Studio installed. If your XPression installation is upgraded to a new version, you will need to upgrade your Elections Player as well. Contact Bannister Lake Support for assistance.
Flow and Database Connection
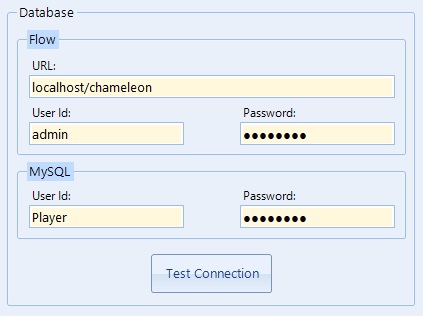
You need to connect the Elections Player to your Chameleon database using both Flow user credentials and MySQL database user authentication. For Flow, any valid user credentials will suffice. The MySQL database user authentication values would have been correctly configured during the initial installation. Use caution when modifying these values. Contact Bannister Lake Support for assistance.To modify the Flow credentials or the MySQL database connection values, select File > Preferences.
Modify the Flow credential values and/or the MySQL database connection values and settings as needed.
- Click on the Test Connection button to test the connection values.
Click OK to save your changes.
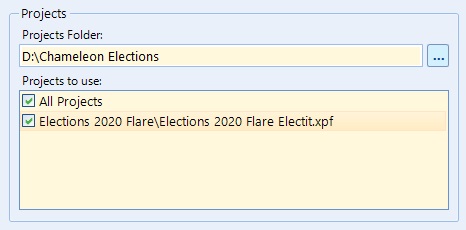
XPression Projects
You will need to specify the location of the Projects Folder that is the root folder for the XPression Project folders. In each of the XPression Project folders, there will be the Project Files (XPF) that the Elections Player can use if selected.
To modify the Projects Folder location or the XPression Project files to use, select File > Preferences.
Modify the Projects Folder location as needed. You can also click on the Browse button (...) and select the folder from the dialog. Once the location has been updated, the list of available XPFs will be shown in the 'Projects to use:' list.
- The Elections Player can use any number of the XPFs listed. Choose at least one of the XPFs listed.
Click OK to save your changes.
Access XPression
When you access the Elections Player, an XPression instance is launched, but the XPression Studio interface is hidden by default. You can make XPression available by selecting XPression > Show Expression GUI. Not applicable to XPression BlueBox.
Elections Player Logs
The Elections Player system log is available for troubleshooting purposes. Select Help > Show Current Logs. You can also clear the log file by selecting Help > Clear Current Logs.
Note: If you contact Bannister Lake Support for assistance, you may be asked to send along the log file contents for review; therefore, do not clear those log files until Support has had a chance to review them.
Take Election Results to Air
Before you are able to show any election results on air, you have to decide how to setup the elections show package. The most common way is to setup display content that is intended to occupy most of the screen (fullscreen scenes) using at least 1 of the Rundown tabs in the UI shown below. The lower third content can be setup using another of the Rundown tabs.
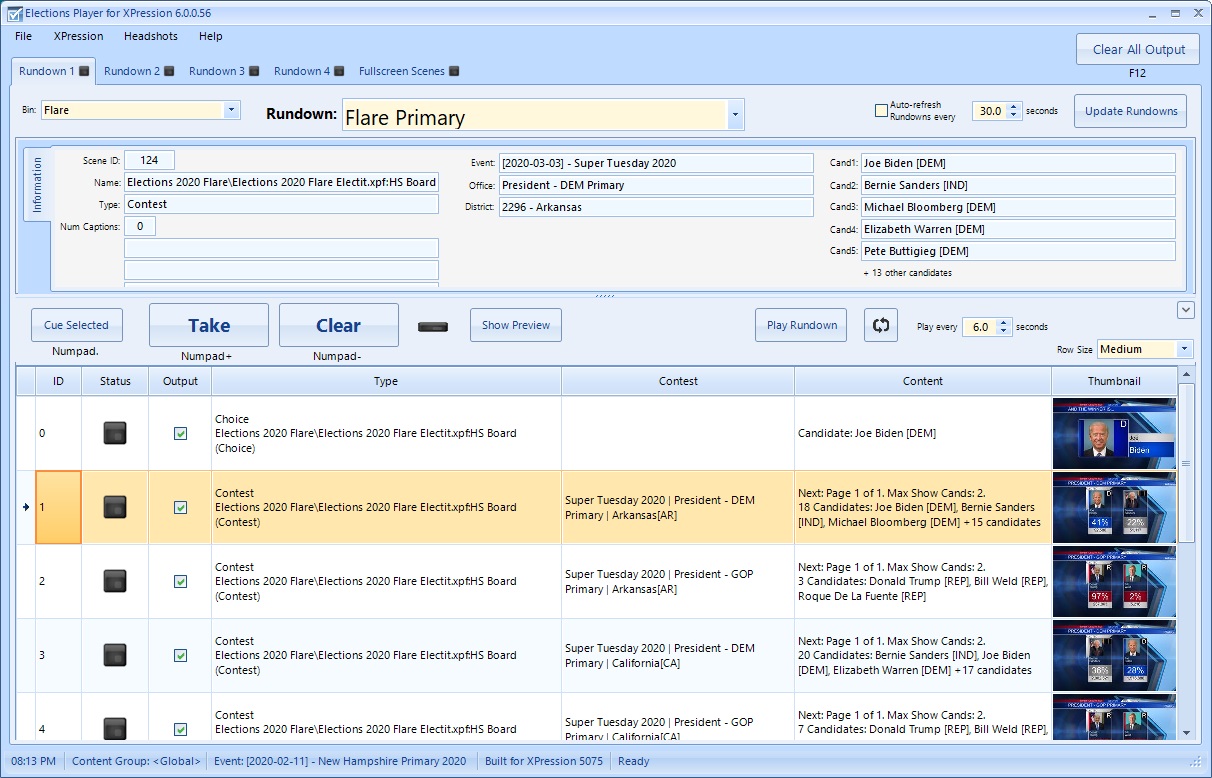
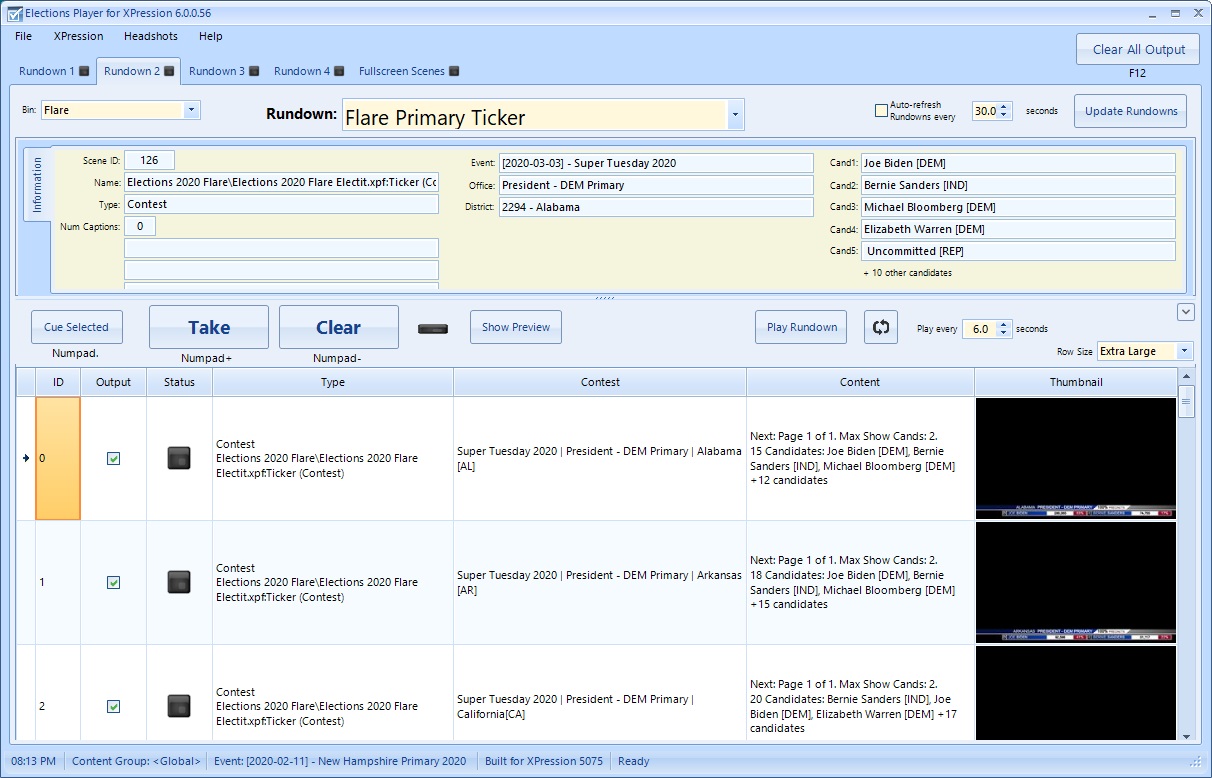
Using the Rundown Tab
The Rundown tabs are used to display elections rundown lists. These lists are composed and managed using the Election Rundown Builder web module within Flow.
Elections Rundown lists are grouped into 'Bins'. The most common usage for a bin is to identify who created the bin and/or what the rundown lists in the bin are about.
- Click on the Bin drop-down list and select from any of the available bins.
- Click on the Rundown drop-down list and select from the available rundowns.

The grid should now show all the members of the rundown list as they were assembled in the Elections Rundown Builder.
Note that the contents of the Bins and their Rundowns, as well, as the items of the selected Rundown can be refreshed from the database by pressing on the 'Update Rundowns' button. The update can also be done periodically by enabling the 'Auto-Refresh Rundowns every N seconds' option.
Rundown Information Panel

The Item Information Panel shows the information that was set into the selected rundown item. Depending on the item's scene type, the list of candidates shown are either set using the Elections Rundown Builder module in Flow (for a 'Choice' scene) or are obtained from the database directly in descending order based on the candidates' vote count (for a 'Contest' scene). To learn more about scene types, go to the table on Scene Names in Elections Player Tags.
Note that by default the 'Image & Notes' tabs are hidden. To make these tabs visible, enable the 'Show Information Tabs' option in the 'Playlist Settings' section in the Preferences dialog. For more information on enabling this feature, see the 'Rundown Settings' section of the documentation on the Elections Player for XPression#General Settings Tab below.

This tab will show a larger version of the thumbnail of the selected Rundown item. If there are any notes entered for the Rundown, the panel on the right will display them.
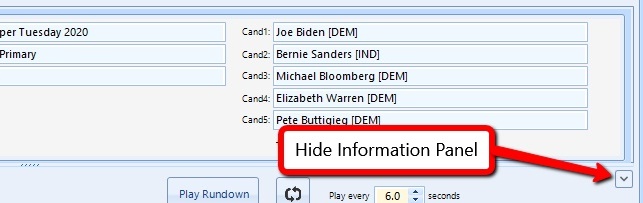
The Rundown Information Panel can be hidden if so desired. To hide the panel, click on the 'Hide Information Panel' button. To show the information panel again, click on the same button.
Rundown Items Grid
The Rundown Item grid shows the items that are contained in the selected Rundown. To select an item, click any where on the row that defines the item's contents. An arrow on the leftmost column will appear indicating that the item is selected. The cell which was clicked on will be shown in an orange highlight.
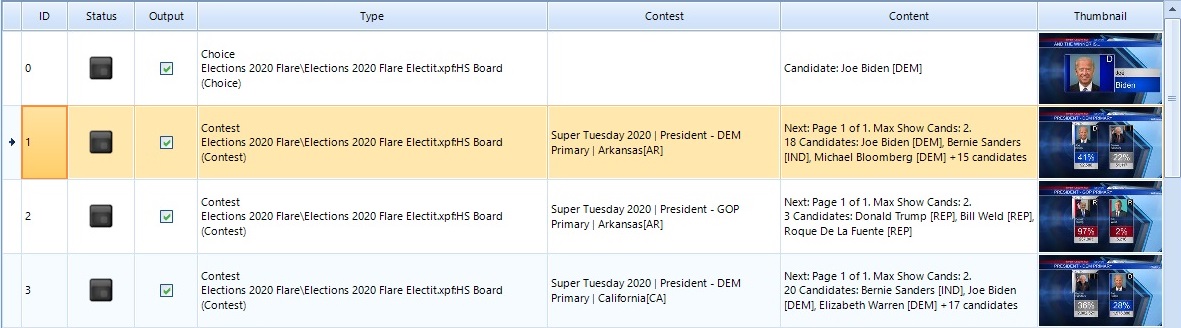
The size of the thumbnails and also the heights of the item rows can be changed by selecting a different value for 'Row Size' in the drop-down list. 
Rundown grid columns and their meaning:
- 'Output' - By default, an item is enabled for output when it is added in the Elections Rundown Builder in Flow.
- The item can be disabled by left-clicking on the 'Output' checkbox which will clear the check mark indicator.
- A disabled item will be skipped over when using the 'Play Rundown' mode (see the topic on 'Elections Player for XPression#Rundown Controls Panel' below).
- Note that items are disabled only for so long as the Elections Player is running. Once the Elections Player is shutdown or restarted, the 'Output' settings for the items are re-enabled once more.
- To re-enable an item, click on the checkbox once more.
- Tip: You can enable or disable all Rundown items at once by left-clicking on the 'Output' column header.
- 'Status' - Indicates whether the item is off-air, on-air or is cued up.
- 'Type' - Indicates what the item's scene type is, followed by the name of the scene.
- 'Contest' - Indicates what the Event, Office and District that are being contested for.
- 'Content' - The first part indicates what page will be shown when taken to air and how many candidates can be shown at a time. The next part shows all the candidates that are in the contest. If there are non-zero vote data, the candidates will be sorted in descending order based on their vote count.
- 'Thumbnail' - Shows a thumbnail of the scene as generated by XPression Studio. If the Live Thumbnail feature is enabled in the Preference settings, these thumbnails will be replaced every so often with ones generated using actual data available at the time of generation.
Rundown Controls Panel
The Rundown Controls Panel hosts a number of controls and buttons that are used to manage the play out of the items in the Rundown.

Controls (from left to right):
- 'Cue Selected' button - Used to cue up an individual Rundown item. This prepares the item for output by filling in scene with the current elections data from the database at the time of the cueing.
- This button is only available if cueing is enabled for the Rundown in the Preference settings. See the topic on Elections Player for XPression#Preferences for more details.
- First, select the item that you want to be cued.
- Then, click on the 'Cue Selected' button.
- If the cueing operation is successful, the 'Status' LED for the item in the grid will change to show a yellow LED
 or an orange LED
  if the item is currently on-air.
 - Taking the cued item to air will show the scene with the elections data that was setup during the cueing operation.
- 'Take' button - Used to show individual Rundown item on output.
- First, select the item in the Rundown grid.
- Then, click on the 'Take' button. Note that the item's 'Output' status is ignored for this operation.
- If the Take operation is successful, the 'Status' LED for the item in the grid will change to show a red LED.

- You can also use the hotkeys listed below the button (the Numpad+ key in the example diagram above).
- 'Clear' button - Used to clear any Rundown items that are showing on output. Also stops the 'Play Rundown' mode if active.
- On Air LED - The colour of the LED indicates whether any item in the Rundown is showing in the output or not.
- Appears black if nothing is showing.

- Appears red if an item is showing.

- Note that there is also a squarish LED on the Rundown tab next to the label which also reflect the state of the On Air LED.
- Appears black if nothing is showing.
- 'Show Preview' button - Used to show a preview of an individual Rundown item.
- First, select the item in the Rundown grid.
- Then, click on the 'Show Preview' button.
- If successful, you should see the preview output for the item appear on the XPression framebuffer designated for previewing purposes. See the topic on Preferences for more details.
- If successful, the button's label will change to 'Hide Preview'. Click on this button again to clear the preview output.
- 'Play Rundown' button - Used to play all the items with their 'Output' status enabled in the Rundown one at a time, starting from the selected item.
- The player will take the selected item to air and move the selection down to the next enabled item in the Rundown.
- The button will change it's background colour and label to 'Stop Rundown'
 . Pressing the button again will stop the next item from being taken to air but the item currently on-air remains on-air.
 - After the number of seconds indicated in the 'Play every N seconds' control (6 seconds in the example above), the player will take the selected item to air.
- If the looping button is enabled, i.e., showing with an orange background
 , the player will loop back to the top of the Rundown after playing the last item in the list.
 - If the looping button is not enabled, i.e., showing with the regular blue background
 , the player will stop at the last item in list.
- 'Row Size' drop-down list - Use to select the size of the Item thumbnails in the Rundown Items grid.
- Show/Hide Information Panel button - Click on this button to toggle between showing and hiding the Information Panel.

Using the Tickers Tab
The Tickers Tab contains a variety of sections that enables a fair amount of flexibility in how a lower third can be shown. Even though the controls in this tab are targeted for lower thirds, you can still use them for any scene as long as the scene type is appropriate for each Ticker section.
Each Ticker section can be taken to air and also cleared individually by clicking on the associated 'Take' and 'Clear' button so long as there is a scene selected in the related drop-down list. You can also take or clear all selected Ticker sections together by first clicking on the checkbox controls to the immediate left of the Scene drop-down lists and then pressing the 'Ticker ON' or 'Ticker OFF' button. You can show a Preview of what the selected Ticker sections look like together by clicking on the 'Show Preview' button.
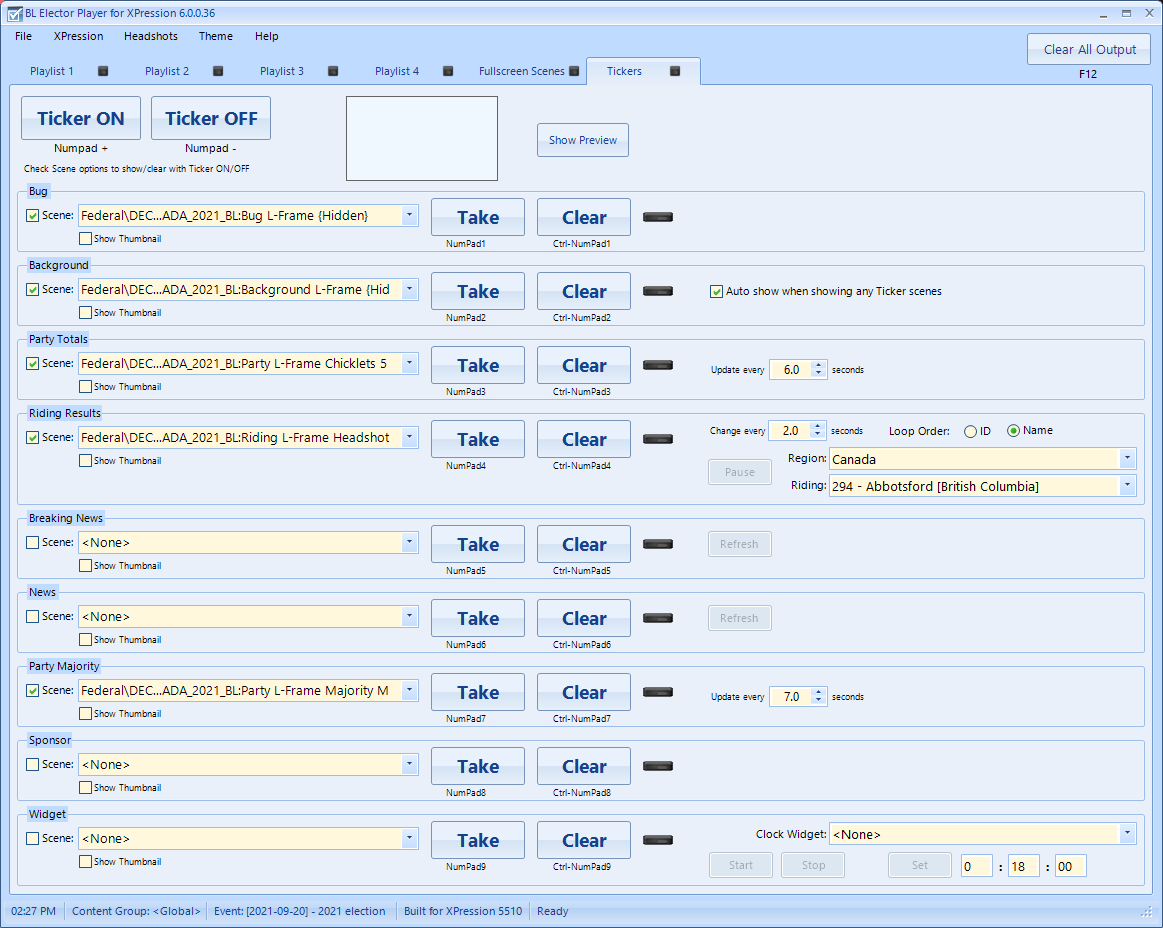
Each of the Ticker Section drop-down lists will only show specific scene types. For more information on what the scenes types are, please look at the Scene naming conventions in the documentation for Elections Player Tags.
- Bug Section - this section is intended for showing station bugs:
- The drop-down list will only list scenes with names starting with 'Bug'.
- Background Section - this section is used for showing lower third backgrounds:
- Only scenes with names starting with 'Background' will be listed in the drop-down list.
- Party Totals Section - this section is intended for showing a running seat count for the election parties for the current election event:
- Only Party scenes will be listed in the drop-down list.
- Riding Results Section - this section is used for looping through the results of each riding/area in a selected region for the current election event.
- The drop-down list will only show Riding/Area scenes.
- When showing on air, the 'Pause' button will be enabled. Clicking on this button will pause the loop timer so that the output stays on the current riding.
- Breaking News Section - this section is used for showing a Breaking News crawl.
- Only Crawl/Ticker scenes will be listed in the drop-down list.
- When showing on air, the 'Refresh' button will be enabled. Clicking on this button will cause the crawl content to be cleared and restarted from the beginning of the breaking news items. This is useful for quickly showing new content in the assigned RSS feeds.
- News Section - this section is used for showing a News crawl.
- Only Crawl/Ticker scenes will be listed in the drop-down list.
- When showing on air, the 'Refresh' button will be enabled. Clicking on this button will cause the crawl content to be cleared and restarted from the beginning of the news items. This is useful for quickly showing new content in the assigned RSS feeds.
- Party Majority Section - this section is intended for showing the progress of each party towards reaching a majority lead in elected count for the current election event.
- Only Party scenes will be listed in the drop-down list.
- Sponsor Section - this section is intended for showing Sponsors.
- The drop-down list will only show scenes with names starting with 'Sponsor'.
- Widget Section - this section is intended for showing clocks or countdown scenes. (Available for Player v6.0.0.91 or later)
- The drop-down list will only show scenes with names starting with 'Widget' or 'Time'.
- When a scene is selected, the list of XPression Clock Widgets in the matching project will be listed in the 'Clock Widget' drop-down list.
- Select the widget that is attached to the text object that you will be using to drive the timing display.
- Once the widget is selected, the 'Start', 'Stop' and 'Set' buttons will be enabled.
- Use the 'Start' button to start the XPression widget's activity (i.e., count-down or count-up). Note that the time is not reset and will simply start from where it was left off at.
- Use the 'Stop' button to stop or pause the XPression widget's activity.
- Use the 'Set' button and associated hh:mm:ss textboxes to assign a time value to the XPression widget. Note that if there are values in the hh:mm:ss textboxes when the Widget is chosen in the Clock Widget drop-down list and you press the 'Take' button, the time values will first be set automatically before going to air. This auto-set action will not be done between subsequent takes and clears. This auto-set action also won't be carried out for the first time after application launch if both the scene and widget settings are recalled from the previous session so it is best to set the time manually after an application launch.
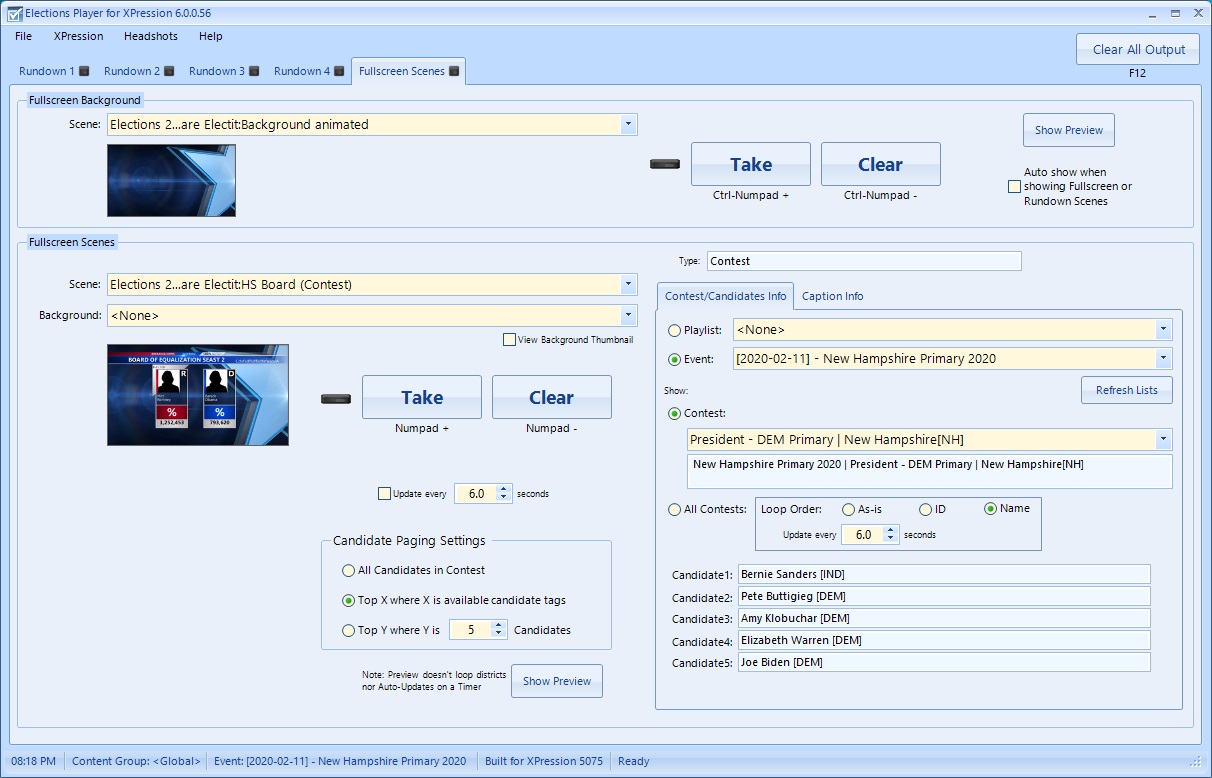
Using the Fullscreen Scenes Tab
The Fullscreen tab is used for a couple of things. Firstly, you can set a common background for all scenes taken to air including the ones in any of the Rundown tabs and in the Fullscreen Scenes. The other thing is that you can use the Fullscreen Scenes as a means of taking any scene in an ad hoc basis or for testing out each of the scenes with data during the preparation stages of an elections show. You can also use the Fullscreen Scenes to loop through the results for a playlist's or an event's contests much like what is done in the Contests Results Section of the Tickers Tab.
IP Commands
The Elections Player can also optionally respond to commands sent over IP. This feature is supported in Elections Player for XPression version 6.0.0.60 or later.
To enable this feature, please see the topic on Elections Player for XPression#IP Command Settings.
When this feature is enabled and connected to a command server, the following display should appear on the status bar at the bottom of the main UI (highlighted by the red rectangle). If the command server is not available or the Player fails to connect to it, a black LED will be displayed instead. The Player will continue attempting to connect to the specified server every few seconds.

Note that the commands only control play out and previews for Rundown items. If the Rundown is in auto-play mode i.e., the 'Play Rundown' button has been pressed for a particular Rundown, IP Commands received that target the Rundown will be ignored.
The following table shows the list of commands that the Player will respond to. Note that for all the following commands in the table, the '#' symbol indicates the Rundown number and should be a value between 1 and 4. The '%' symbol specifies the item number and should be a value that is between 1 and the total number of items in the specified Rundown. The '%' symbol can also be used to specify an item count depending on the command.
| IP Command | Action |
|---|---|
| <#> | Play the currently selected item in Rundown#. |
| <#:%> | Play item% in Rundown#. |
| <#:skip> | Set the selected item in Rundown# to be the next item after the currently selected item. If looping is enabled and the currently selected item is the last one in the Rundown, the selection will jump to the starting item in the Rundown. |
| <#:skip%> | Set the selected item in Rundown# to be the next % items after the currently selected item. Note that the % value can be negative, in which case the selection will go to the previous items in the Rundown. If looping is enabled, the selection can jump back to the top of the Rundown (or the bottom if the % value is negative) and keep going until it reaches the specified item. |
| <#:set%> | Set the item% in Rundown# as the selected item. |
| </#> | Clear play out in Rundown#. |
| <!> | Clear play out in all Rundowns. |
| [#] | Preview the currently selected item in Rundown#. |
| [#:%] | Preview item% in Rundown#. |
| [/#] | Clear the preview in Rundown#. |
| [!] | Clear previews in all Rundowns. |
| ; | Command delimiter. Use to send more than 1 command at a time separated by the delimiter. E.g., <#:set3>;<#>;[2] |
Preferences
A number of features and options for the Elections Player can be modified using the Preferences dialog. The dialog has the following tabs:
- Database & Templates Settings tab,
- Headshots Settings tab,
- General Settings tab,
- Live Thumbnails tab,
- XPression Settings tab,
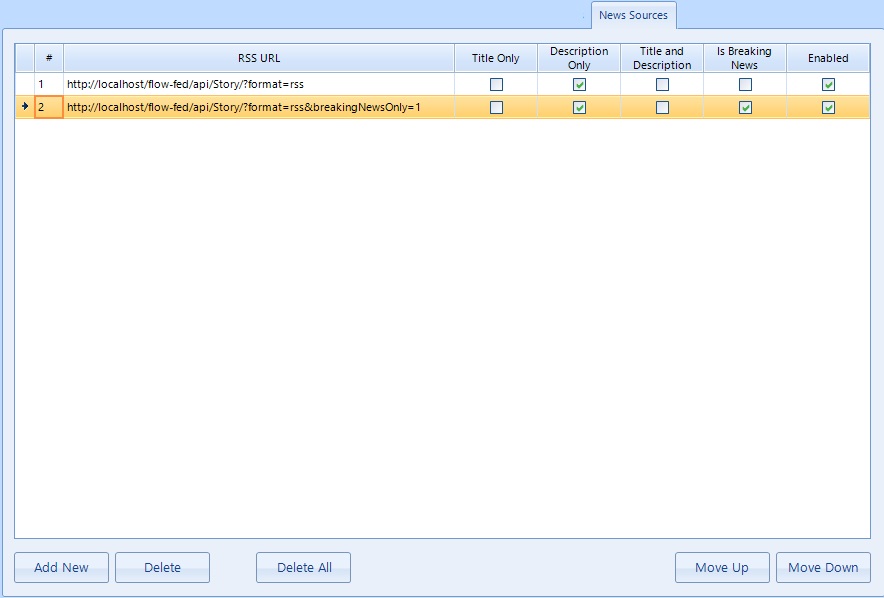
- News Sources tab, and the
- IP Command Settings tab.
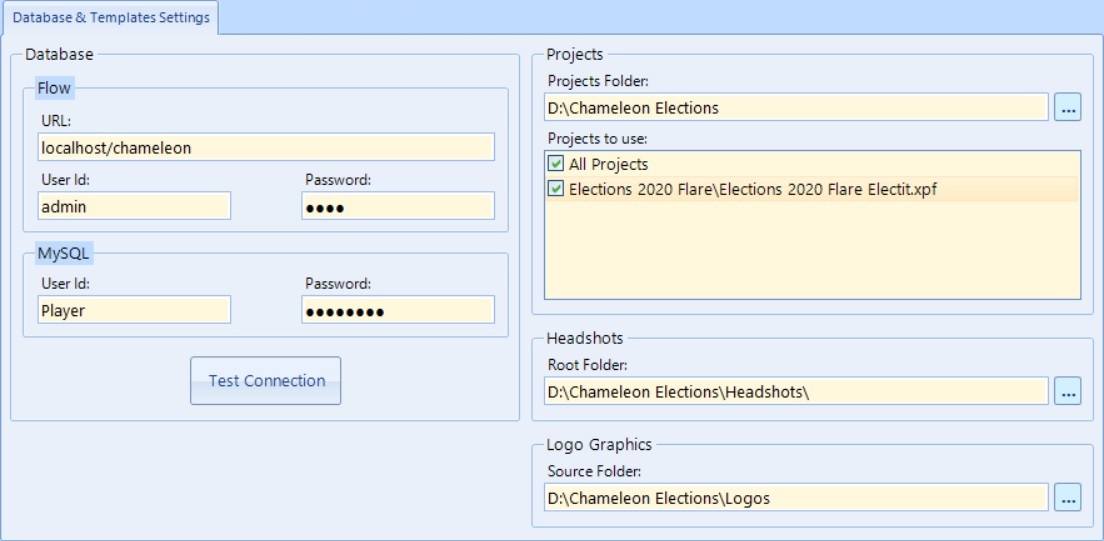
Database & Templates Settings Tab
This left portion of this tab is used for setting the Flow login and MySQL database access credentials. The right portion of the tab is used for choosing the XPression Projects that will be used by the Elections Player. The Headshots and Logo Graphics folders can also be specified in this tab.
- For the Headshots folder, specify or browse for an existing folder which the Elections Player will use to cache the headshot images from the database. These headshot images are used to fill in the candidate headshots in the Rundown items or Fullscreen scenes.
- For the Logo Graphics folder, specify or browse (...) for an existing folder within which should contain Party logo image files. In general, the party logos should be created as materials in the XPression Projects but additional party logo files can also be used if desired.
Headshots Settings Tab
This tab contains settings for controlling various Headshot options.
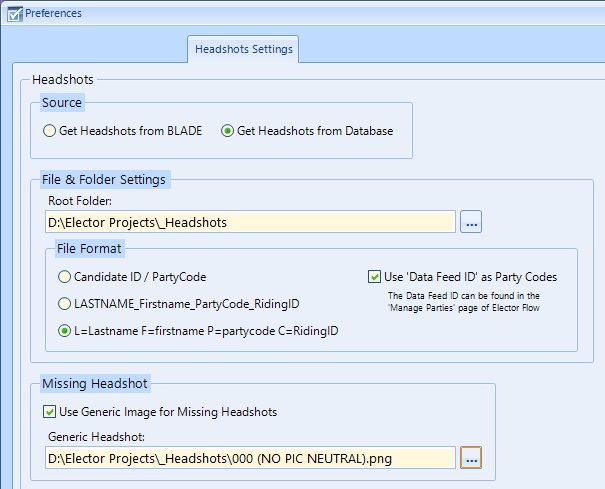
- Source Settings:
- Get Headshots from BLADE - Select this option if the database is in the same system as the Player system or if your internet is very fast and there aren't too many demands on the database (i.e., not too many Flow users). With this option, no headshots will be cached in the system.
- Get Headshots from Database - Generally this is the best option to use when you have the database setup on another system or if there are a fair number of Flow users. With this option, headshots can be optionally cached or temporarily saved on the system.
- File & Folder Settings:
- Root Folder: specify or browse for an existing folder which the Elections Player will be used to cache the headshot images from the database. These headshot images are used to fill in the candidate headshots in the Playlist items or Fullscreen scenes.
- Note that the headshots will actually be saved to a subfolder that is named after the database schema as setup in Elections Flow.
- File Format:
- When caching headshots, the files can be saved in a number of formats depending upon your needs (i.e., using those files as a source for Web uses, for example). As far as the Player is concerned, it doesn't matter what the file format selected is.
- Use 'Data Feed ID' as Party Codes - If enabled, the PartyCode portion of the filename will use the Data Feed ID instead of the Shortname of the party (as shown in the 'Manage Parties' page in Flow).
- Root Folder: specify or browse for an existing folder which the Elections Player will be used to cache the headshot images from the database. These headshot images are used to fill in the candidate headshots in the Playlist items or Fullscreen scenes.
- Missing Headshot Settings:
- Enabling the 'Use Generic Image for Missing Headshots' will cause the Player to use the specified Generic Headshot file on output for any candidates that don't have an assigned image in the Chameleon Database.
- Generic Headshot: specify or browse (...) for the image to use.
General Settings Tab
There are various options in this tab that control the format of some of the output as well as some options to enable, disable or modify some of the Player features.
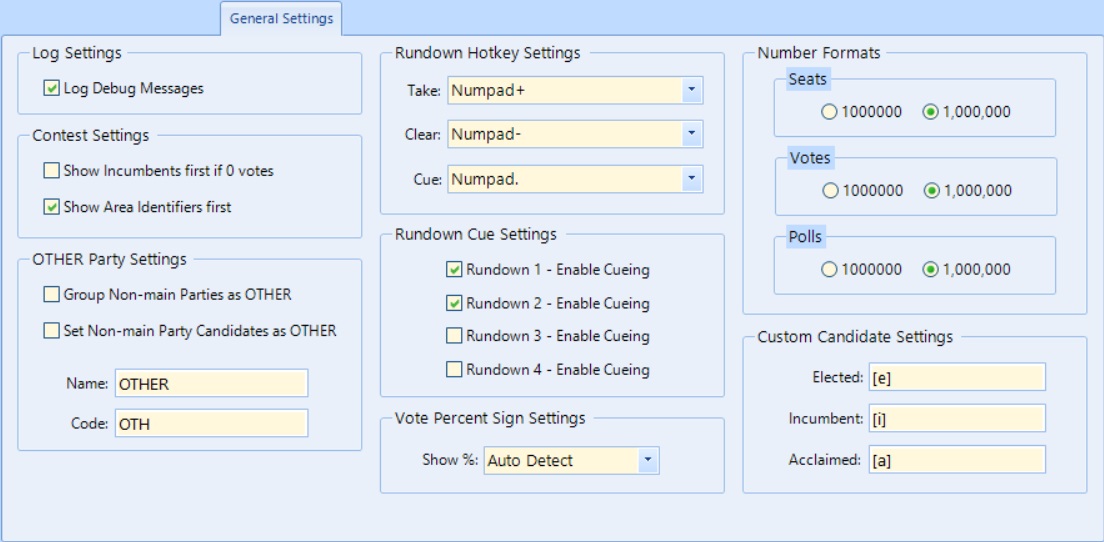
- Log Debug Messages:
- if enabled, additional messages are logged.
- Only enable this setting if directed to do so by the Bannister Lake support team. The additional debug messages can help track down any issues that may have arisen during operation.
- Contest Settings:
- Show Incumbents first if 0 votes - This option affects output. For Contest scenes where there are no votes registered yet, the incumbent candidate is listed first followed by the other candidates sorted in ascending order of their last names.
- Show Area Identifiers first - This option affects the District displays in the Player UI. if enabled, shows the ID of the Area/District first before the name of the Area/District. This can be useful in the Fullscreen Scenes group when attempting to locate a district by it's ID in the Contest drop-down control when a Contest scene is selected.
- OTHER Party Settings:
- These settings affect output of Party names and abbreviations for non-main parties.
- Group Non-main Parties as OTHER - This will group any non-main party into a single 'OTHER' party group. For Party scenes output, all non-main party values will be lumped together and displayed as belonging to the 'OTHER' party.
- Set Non-main Party Candidates as OTHER - For Choice and Contest scenes, any candidate that belongs to a non-main party will be displayed as belonging to the 'OTHER' party on output.
- OTHER Name & Code - By default, the 'OTHER' party's full name is 'OTHER' and it's code (abbreviation) is 'OTH'. Modify these values to suit.
- Colour - This setting specifies the OTHER party's colour and is used on output via the use of the ^choice[#].party.colour and ^choice[#].party.colourvalue tags. Please see Elections Player Tags for more details on those particular tags. You can type in the RGB values as a Hex string or use the Colour Dialog to chose the colour by clicking on the ... button.
- Rundown Hotkey Settings:
- These settings affect what the hotkeys for the associated Take, Clear and Cue actions are. They also affect the labelling of the hotkeys beneath each of their associated button controls.
- Take hotkey - Default is the Numpad+ key.
- Clear hotkey - Default is the Numpad- key.
- Cue hotkey - Default is the Numpad. key.
- Other hotkeys that can be assigned are: Enter, Numpad/, Numpad*, Ctrl Numpad+, Ctrl Enter, Ctrl Numpad-, Ctrl Numpad/, Ctrl Numpad. and Ctrl Numpad*.
- Rundown Cue Settings:
- These settings affect the Rundown UI. Enabling any option shows the 'Cue Selected' button and hotkey label for the associated Rundown tab.
- Enable the setting for the particular Rundown tab that you want cueing support for. Cueing a Rundown item is useful if the particular item's scene takes a long time to setup with elections data (e.g., like a map).
- Vote Percent Sign Settings:
- Show % - This setting affects the output of the % sign for percentage values like polls reporting or vote percentage.
- The default option is Auto Detect. This means that if a text object in a scene contains text that has a '%' symbol in it, the output will also contain the '%' symbol.
- The Never option means that the % symbol will never be shown on output.
- The Always option means that the % symbol will always be shown on output.
- Decimals - This setting affects the output of percentage values in terms of the number of decimals to show.
- The default option is Auto Detect. This means that if a text object in a scene contains text that has a specific number of decimals in it, the output will also contain the same number of decimals.
- 0 - 4: Shows the number of decimals indicated in the option.
- Show % - This setting affects the output of the % sign for percentage values like polls reporting or vote percentage.
- Number Formats:
- These settings affect the output of Seats for a Party, the Vote counts in a contest and the Poll counts.
- There are only 2 options available for showing count numbers.
- Numbers without commas as group separators. E.g., 1000000.
- Numbers with commas as group separators. E.g., 1,000,000.
- Custom Candidate Settings:
- These settings affect the output for the Candidate names when using custom tags. See the information on the ^choice.custom tag found in Elections Player Tags.
- Elected - the specified text will be used as part of the candidate's name where indicated in the custom format string. By default, the string value is '[e]'.
- Incumbent - the specified text will be used as part of the candidate's name where indicated in the custom format string. By default, the string value is '[i]'.
- Acclaimed - the specified text will be used as part of the candidate's name where indicated in the custom format string. By default, the string value is '[a]'.
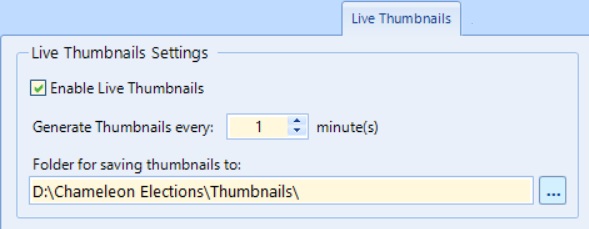
Live Thumbnails Tab
The options on this tab are used to enable the Live Thumbnails feature and to control the frequency with which the thumbnails are updated. You will also need to setup an existing folder for the Elections Player to save the thumbnails into.
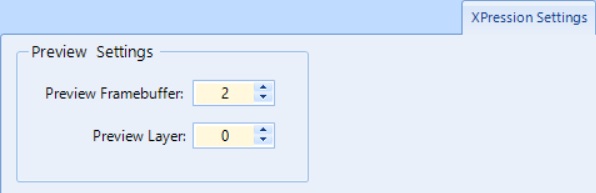
XPression Settings Tab
The options on this tab are for setting up the XPression framebuffer and layer to use for Previewing output.
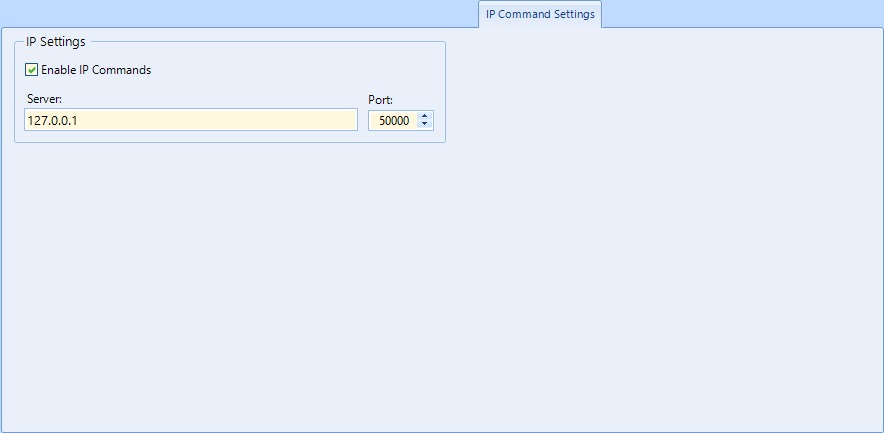
IP Command Settings Tab
The options on this tab are used to enable the IP Command feature and for setting up the connection to a Command Server.