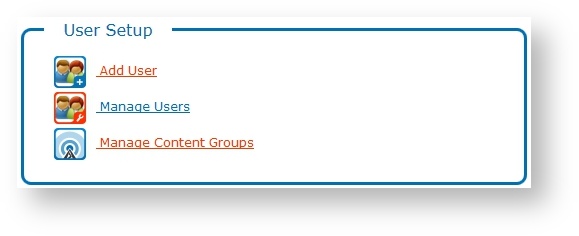
User Setup
- Carrie Warner (Unlicensed)
- Jonathan Schmale
- Chris Mintz (Unlicensed)
Every person who needs access to Flow needs a user account in the system. Each user account is assigned user credentials including a User Name and Password as well as a role to control what that actions that user can perform in the system.
As part of the installation, Flow comes pre-installed with a System Administrator user by default. This System Administrator user account can be used to access Flow and create new and manage existing users as well as assign user permissions.
Add Users
You can create new user accounts and assign those users specific access in Flow using the User Setup > Add User option. 
- Enter the user’s First Name, Last Name, and Email in the fields.
- Configure the user’s access in the system by selecting a Security Level option from the list.
In TweetOut, see the topic TweetOut Flow Security Levels for details.
In Super Ticker, see the topic Super Ticker Flow Security Levels for details.
In Snow Day, see the topic Snow Day Flow Security Levels for details. - Specify a Content Group for the user to limit user access to content, or select All to allow the user to see all content in the system.
- Enter the User Name to sign in to Flow. The User Name can contain characters, numbers, dashes, and underscores. No other special characters are allowed.
- Enter the user's Password twice. Both passwords must match.
- Click Add New User Now.

Note: Your system is only as secure as the passwords for your user accounts. It is highly recommended that you use strong passwords for all Flow user accounts. The strongest passwords include a long combination of letters, numbers, uppercase, lowercase, symbols, and other special characters.
Manage Users
Flow administrators can manage system user accounts as well as manage system access per account using the User Setup > Manage Users option.
Note: The System Administrator user account, created as part of the initial installation, cannot be modified or removed. However, the password can be changed.
Current Users
The list of current users details existing user information, whether or not the user account is enabled, the date the user account was added, and the last time the user signed into the system.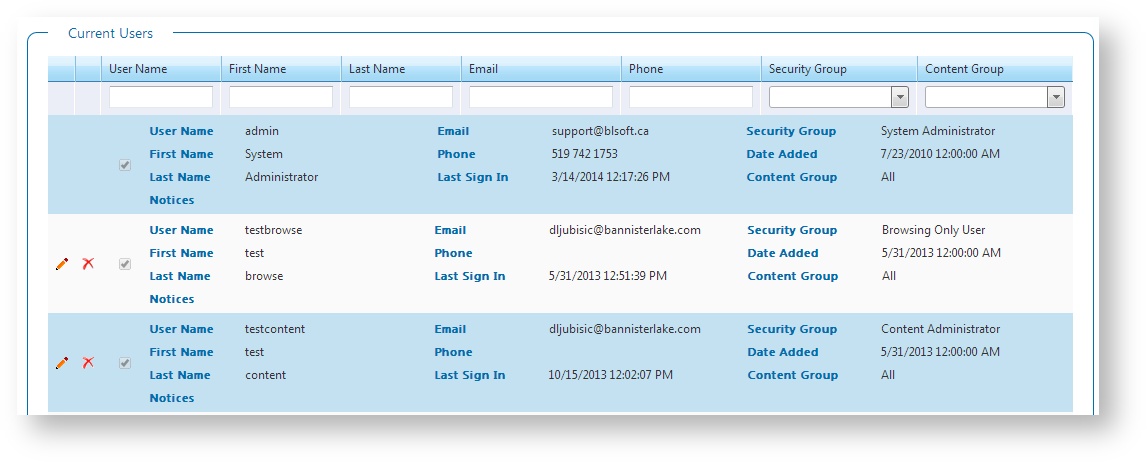
Notes:
- Click on a column header to sort in ascending or descending order.
- Filter the list of users by: User Name, First Name, Last Name, Email, Security Group, or Hub (Content Group).
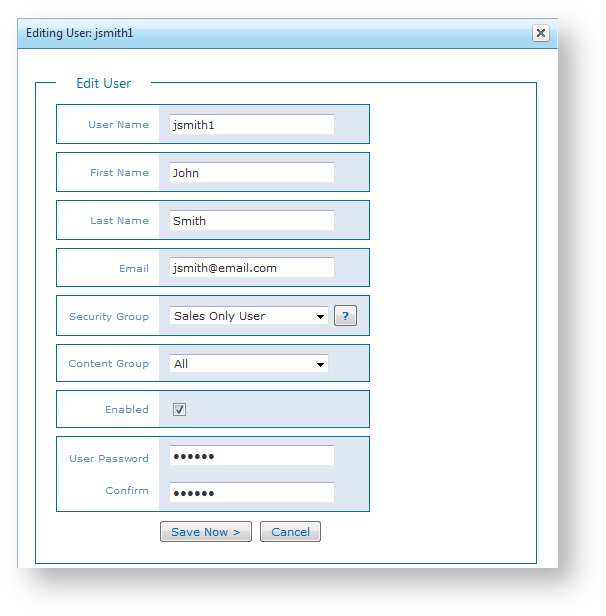
Modify Users
You can modify user information as well as enable or disable user accounts.Click Edit to modify the user account.
- Modify user account information as needed.
- Modify user access as needed. Click the Help (?) button to see the Flow module access for each role in the Security Levels dialog.
- Select or clear the Enabled option to enable or disable the user account in Flow. Disabled users cannot sign into the system or access any Flow functionality; however, should the user account be needed in the future, it can be re-enabled instead of re-created.
- Enter a new User Password for the user, if needed. Enter the password again to confirm. Both passwords must match.
Click Save Now.

Remove Users
Click Remove to remove the user account. Click OK to confirm. 
Tip: To avoid removing the user account entirely from the system, consider disabling the user account instead. See Modify Users above for details.
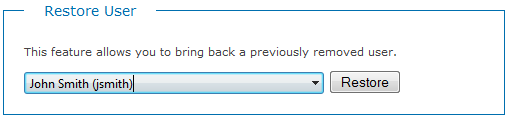
Restore Users
If you remove a user by mistake, you can restore that user account in Flow.- Select the user you want to restore and click Restore.
- Click OK to continue.

|
