Use the Traffic module to create traffic reports.
For example, you may want to create a traffic report detailing a collision at a specific intersection to alert viewers of potential delays as a result. In situations like construction zones reports, you can also provide drive time details.
You can create and manage your traffic reports in Chameleon. From the Home page, under Content Control select Traffic.
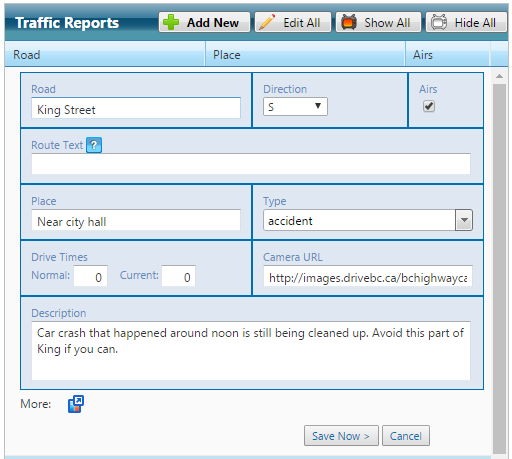
Add New Traffic Report
- If prompted, select a Content Group from the list to filter content by that Content Group. Content Groups are created and managed in the User Setup > Content Groups module.
- Under Traffic Reports, click Add New.
- Enter a Road name.
- Select a Direction, if necessary.
- Enter descriptive Route Text, as needed, such as Gardiner EB (427 to DVP) or 410 Southbound (Steeles to 401).
- Enter Place details, such as a cross-street, corner, landmark, or other identifying details.
- Select the Type of traffic incident.
- Enter Drive Time values, if desired.
- Enter a Camera URL, if desired
- You can use a traffic video feeds that resembles this: http://www.quebec511.info/diffusion/en/camera/camera.ashx?format=mp4&id=3452
- Enter a Description, if desired.
- Enter More information via Dynamic Fields if desired.
- Specify whether this traffic report is enabled for broadcast using the Airs option. Clear this option to prevent this report from being broadcast.
- Click Add Now.
Note: New traffic reports are automatically added to the All Traffic playlist, which is used to set the order of the reports. See the section Order Traffic Reports below for details.
Manage Existing Traffic Reports
You can manage existing traffic reports at any time as follows:
| Action | Details |
|---|---|
| Modify Traffic Reports |
 Click Edit All to modify all traffic reports at once. Click Save All Changes. Click Edit All to modify all traffic reports at once. Click Save All Changes. |
| Remove Traffic Reports | Removing a traffic report also removes that report from any playlist where it has been added. Click Remove |
| Enable or Disable Traffic Reports for Broadcast |
|
| Sort Traffic Reports | You can sort the columns of the table; however this sort order does not affect broadcast output. By default, the sort order is the broadcast order. Click on a column header to sort in ascending or descending or default order. |


In this section: