Step by step instructions for how to generate branding assets (bugs & snipes) using Chameleon on the Ross Video, XPression graphic platform.
Prerequisites
Before you begin, make note that this help page is designed for broadcast graphic operators, possibly engineers, that have been trained on how to use XPression CG. Following this document without the required knowledge base could make it difficult to follow. The following prerequisites are required:
Access to Chameleon (Flow login through a web browser)
Ross Video, ‘XPression’ installed with prior training/knowledge
Chameleon’s publication tool ‘Gears for XPression’ installed (check to ensure you have the latest version from the link below)
Chameleon graphic output tool ‘Branding Player for XPression’ installed (check to ensure you have the latest version from the link below)
XPression installs can be found by contacting your Ross Video representative. The components: Gears & Branding Player must match the specific version/build of XPression you are using. Links below contain sub-folders which are labelled with the XPression matching building number. Download the versions that match your XPression version:
http://bannisterlake.com/dl/installs/Chameleon/_branding/xpr/
http://bannisterlake.com/dl/installs/Chameleon/_gears/
Create XPression Project
XPression is a powerful broadcast graphic CG produced by Ross Video. This section assumes you have sufficient knowledge of this graphic tool and understand how to build graphic scenes with animations.
Training and instruction on how to create graphics and animations using XPression can be found on the Ross Video web site: https://www.rossvideo.com/knowledge-center/ross-university/ or contact your Ross representative for more options.
Due to the complexity involved in building scenes in XPression the sample scene used in this example has been made available for download and can be found here: http://bannisterlake.com/dl/installs/helloworld/HelloWorld_Branding.zip
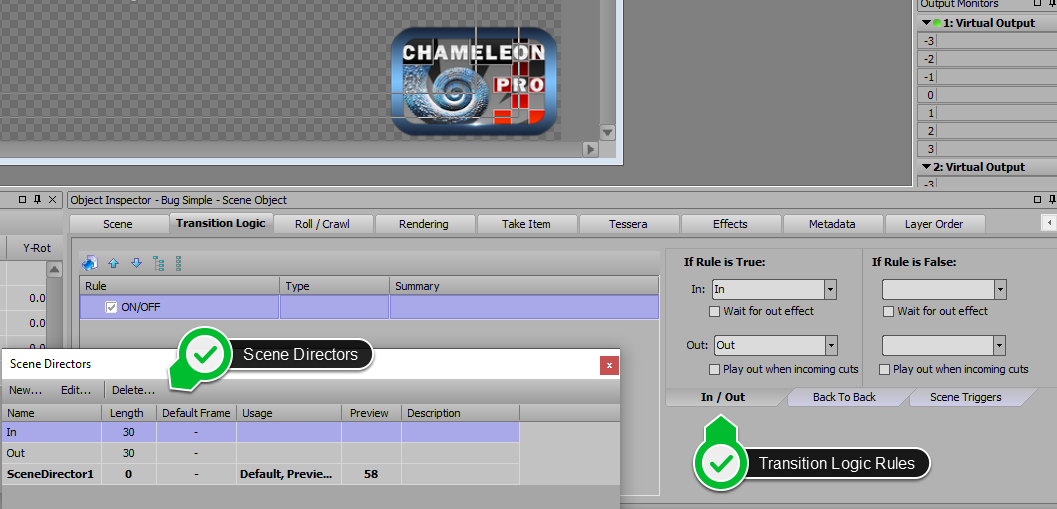
In this project we build a simple branding element such as station ID or logo, often referred to as a ‘bug’ in the broadcast industry.
The scene contains 2 ‘Scene Directors’ which animate on and off the bug graphic. Using XPression’s Transition Logic we set the rules for which animation to use when bringing the graphic on or off.
Publish Graphics using Branding Gears
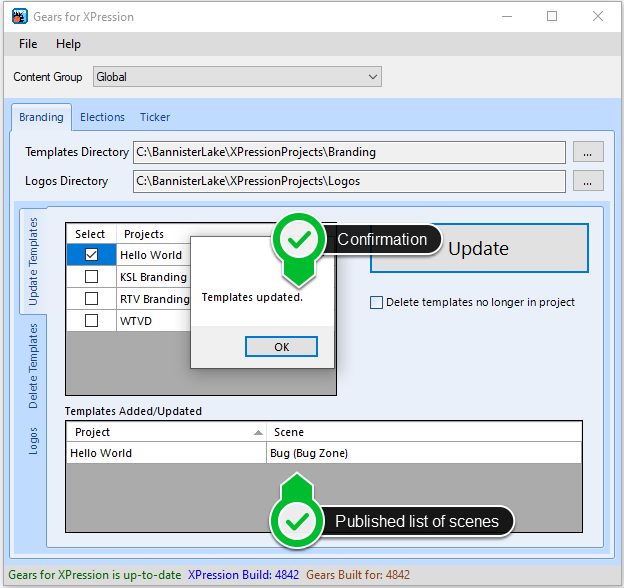
Once you have your XPression scene completed it needs to be published to the Chameleon database. This step is what makes your different scenes or assets available in the Chameleon Flow or browser UI.
Gears needs to load your XPression project in order to publish. Therefore you will need to make sure your XPression dongle is attached and XPression is properly installed.
Configure Branding Gears settings:
Launch Gears and confirm you have the correct settings for your system.

Publish:
Gears is a multi-purpose publication tool for Chameleon. It is used for publishing Election, Ticker as well as Branding scenes to the Chameleon DB. Here we will focus on publishing Branding components.
Once Gears has opened follow the outlined steps to: set your default project & logo folders and publish your project.

Be sure to update the ‘Templates Directory’ to match your system. All XPression branding projects should be in their own sub-folder in the ‘Templates’ location. This allows you to support multiple channels as each channel or look would be in its own folder.
The Logos path should also match, but it should not be a sub-folder of your branding templates folder.
Upon successful completion of a publication you will receive a dialog confirming that assets were updated and it will list all the scenes published:
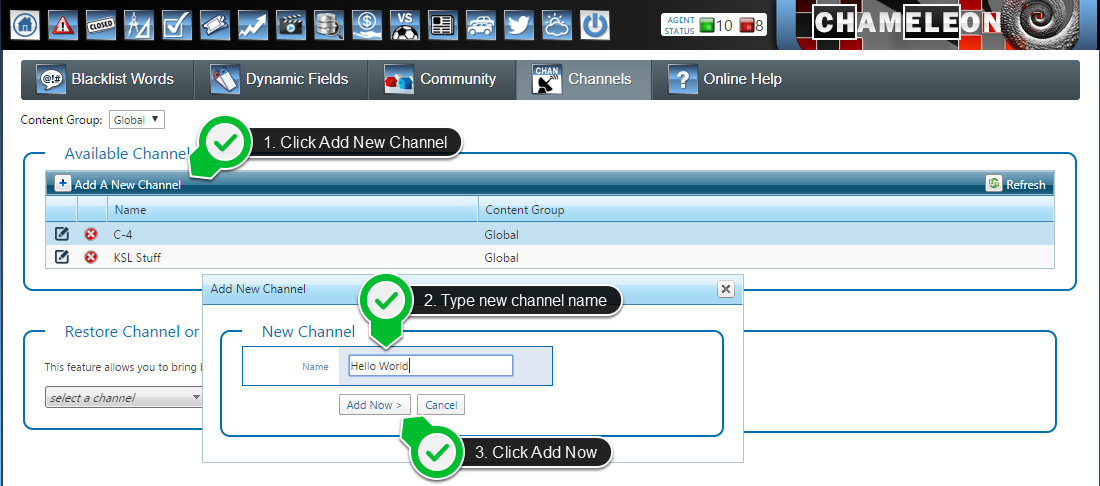
Create Channel in Flow
Now that a graphic template has been published we can create a channel that the branding asset can be applied or used on. Once a channel has been created we assign a player to that channel. First go to the ‘Shared’ section and select ‘Channels’.

Once on the ‘Channels’ page you can click on ‘Add A New Channel’ from the top left of the list/grid. When the ‘Add Channel’ dialog comes up you can enter the name of your channel then click ‘Add Now’.
Create/Assign Player in Flow
Now that a Channel has been created to need to create/assign a Player for the new Channel to run on. From the main page or dashboard select ‘Players’ from the Branding section:
