Setting Up A Brando Web and Data Server
Setting Up and Configuring A Brando Data Server
The following technical article is to be used by broadcast engineering groups to setup and configure the data and web server core for the Brando solution. This article does not cover setup of the Brando Players or Switcher components.
Configuring Your Server Environment for the Brando Data and Web Components
Configuring Windows Features and Adding Internet Information Services (IIS)
The following article covers setup for Windows Server 2008/2012/2016, Windows 7 & 10.
Web server features will need to be enabled on your server
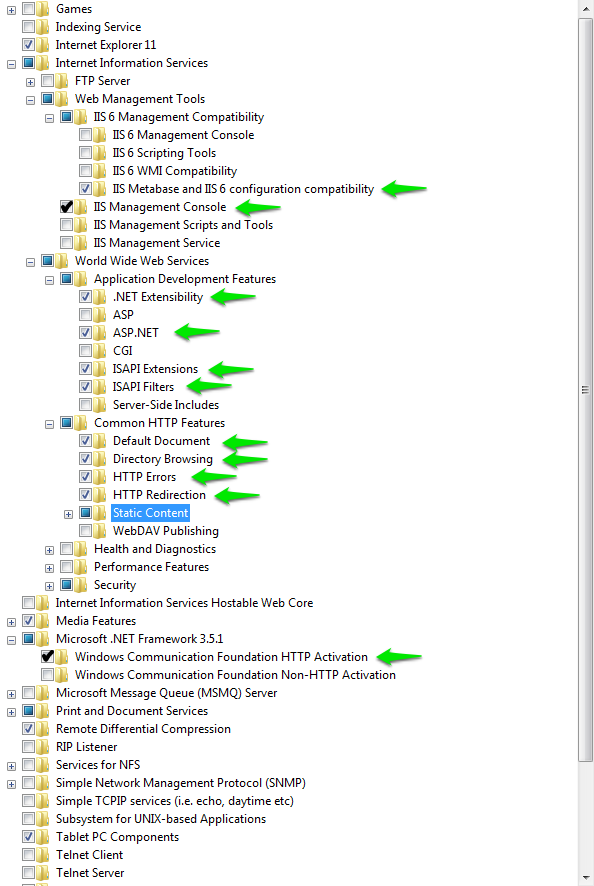
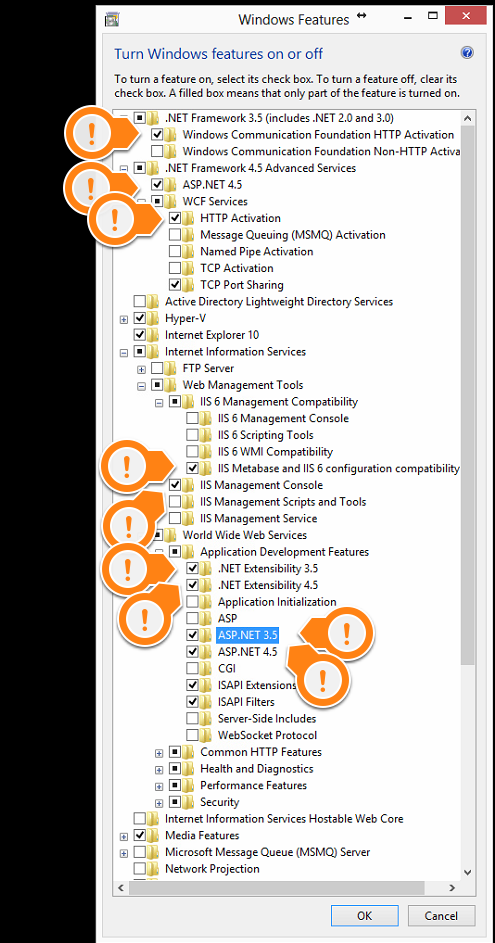
Step 1 & 2 - WINDOWS 7/10 - Open Control Panel and open Programs Features. Click on Turn Windows Features On or Off


- Web Management Tools
- IIS 6 Management Compatibiltiy
- IIS Metabase and IIS 6 configuration compatibility
- IIS Management Console
- IIS 6 Management Compatibiltiy
- World Wide Web Services
- Application Development Features
- .NET Extensibility
- ASP.NET
- ISAPI Extensions
- ISAPI Filters
- Common HTTP Features
- Default Document
- Directory Browsing
- HTTP Errors
- HTTP Redirection
- Static Content
- Performance
- Static Content Compression
- Dynamic Content Compression
- Application Development Features
Microsoft .NET Framework 3.5.1:
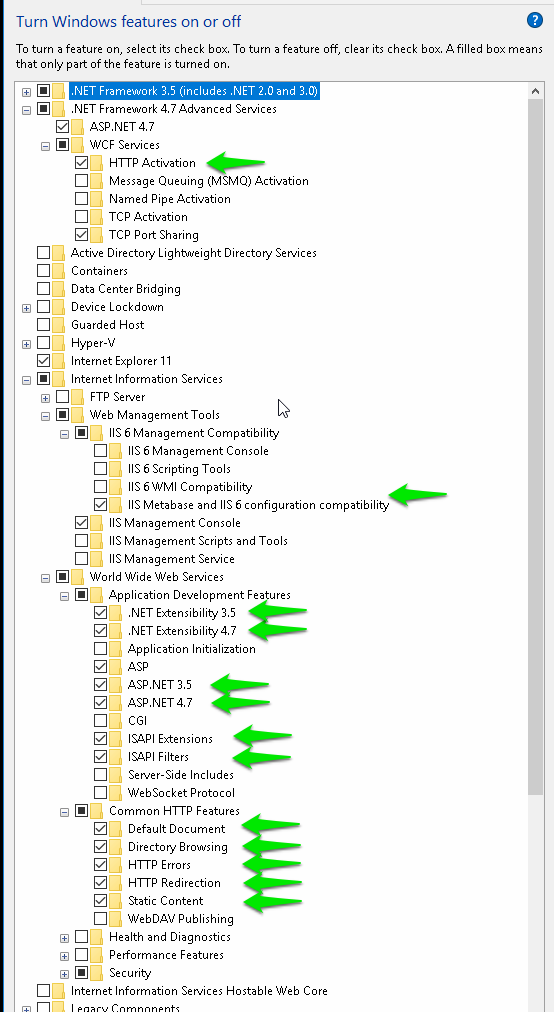
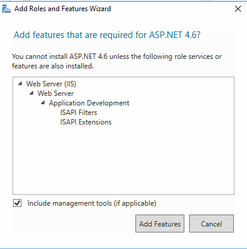
- Windows Communication Foundation HTTP Activation
- WCF Services
- HTTP Activation
- Web Management Tools
- IIS 6 Management Compatibiltiy
- IIS Metabase and IIS 6 configuration compatibility
- IIS Management Console
- IIS 6 Management Compatibiltiy
- World Wide Web Services
- Application Development Features
- .NET Extensibility 3.5
- .NET Extensibility 4.7
- ASP.NET 3.5
- ASP.NET 4.7
- ISAPI Extensions
- ISAPI Filters
- Common HTTP Features
- Default Document
- Directory Browsing
- HTTP Errors
- HTTP Redirection
- Static Content
- Performance
- Static Content Compression
- Dynamic Content Compression
- Application Development Features
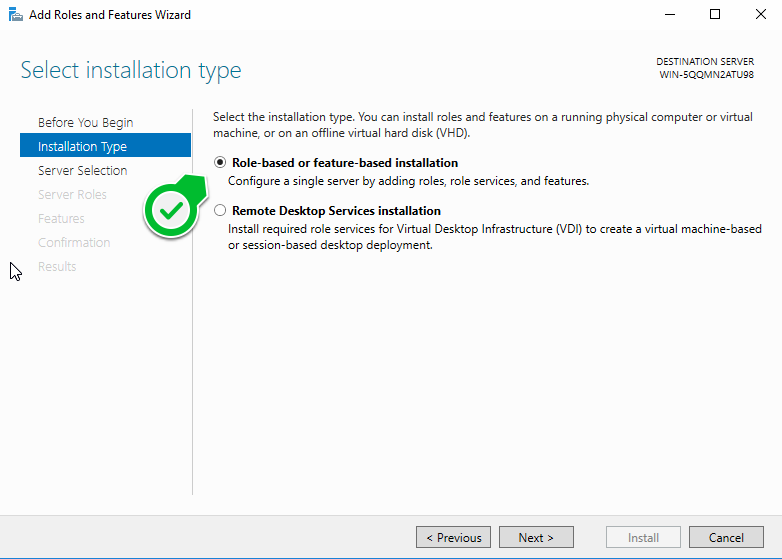
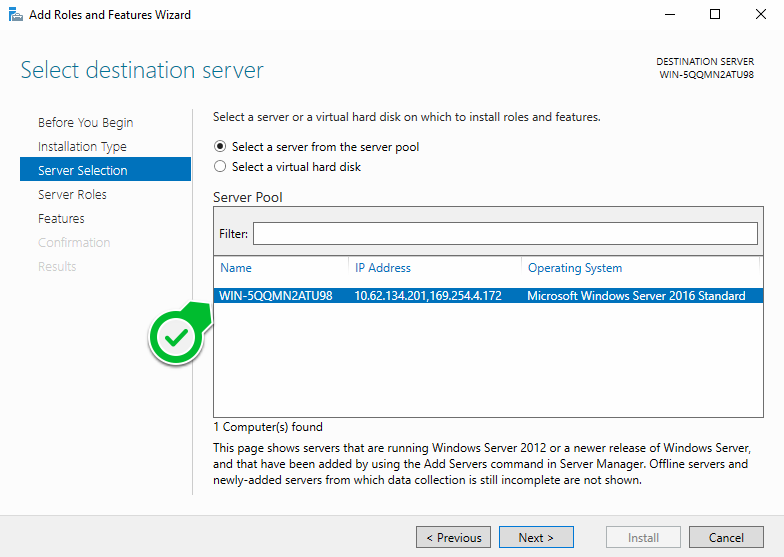
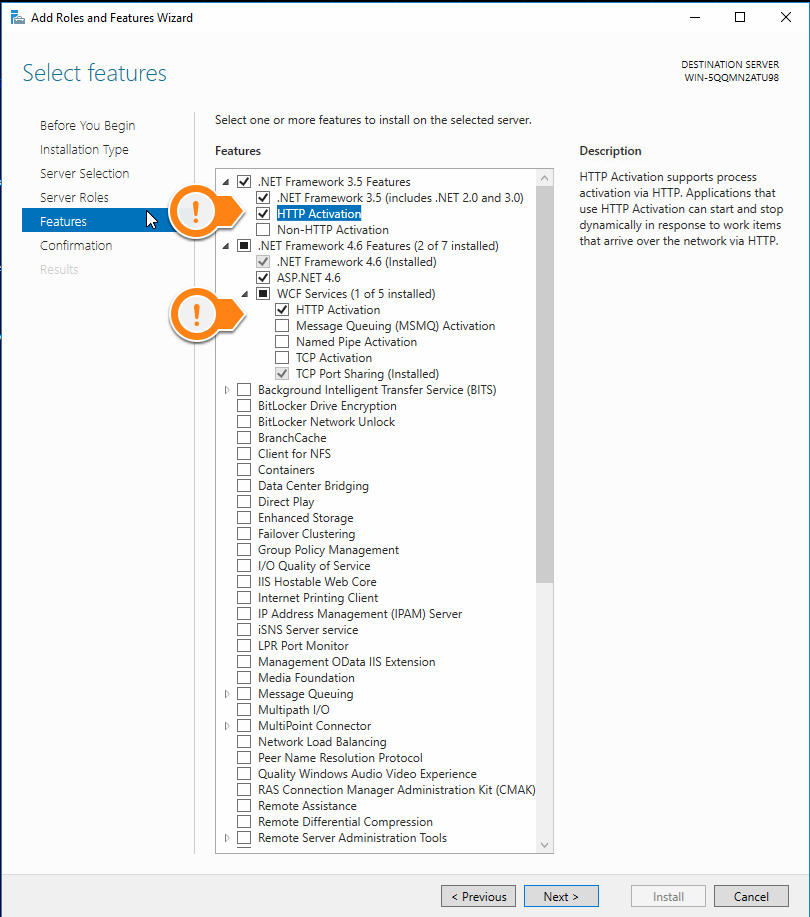
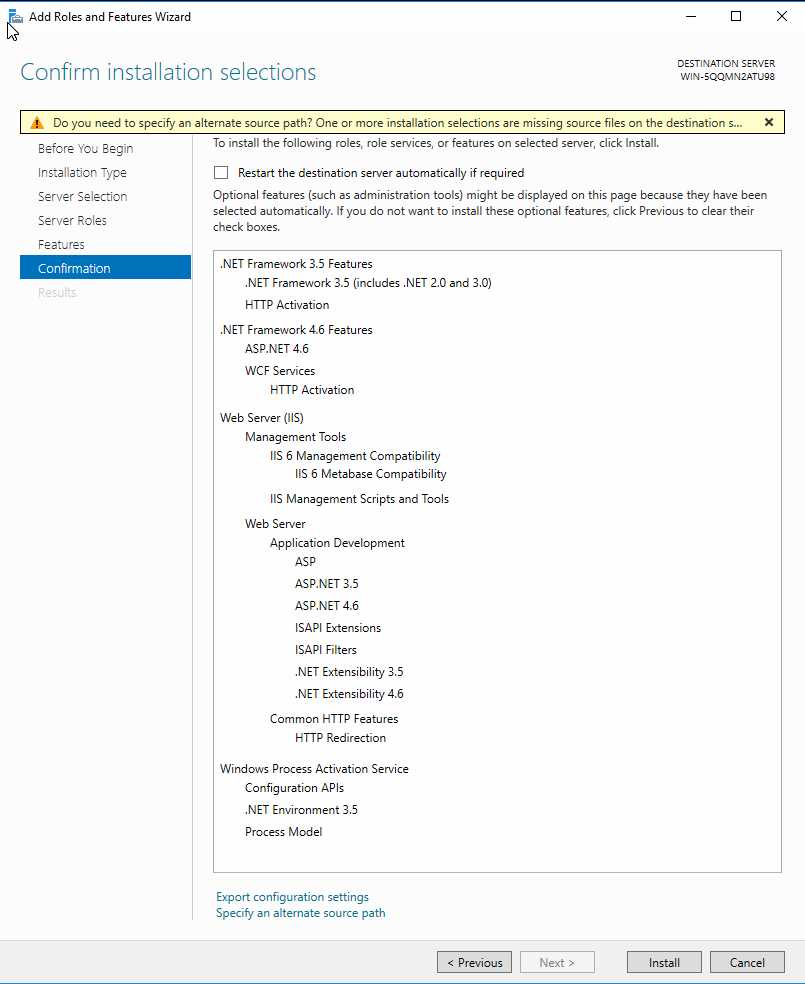
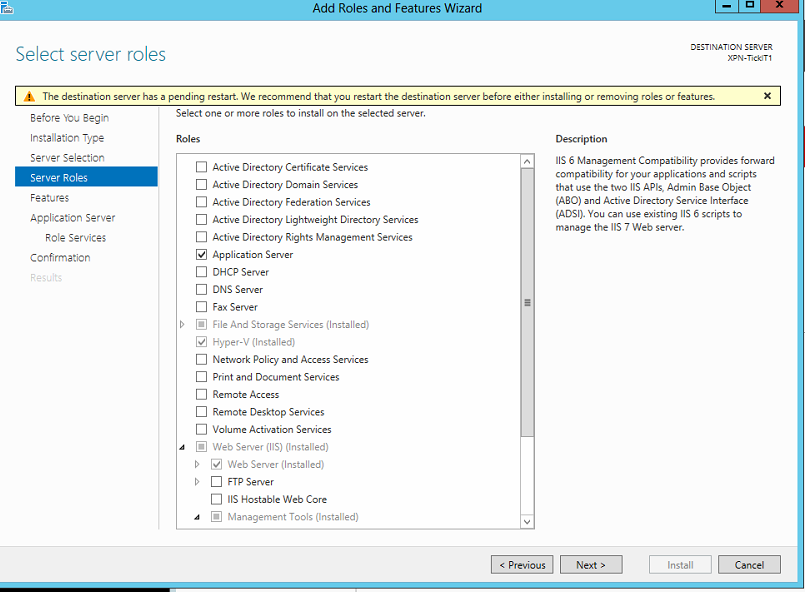
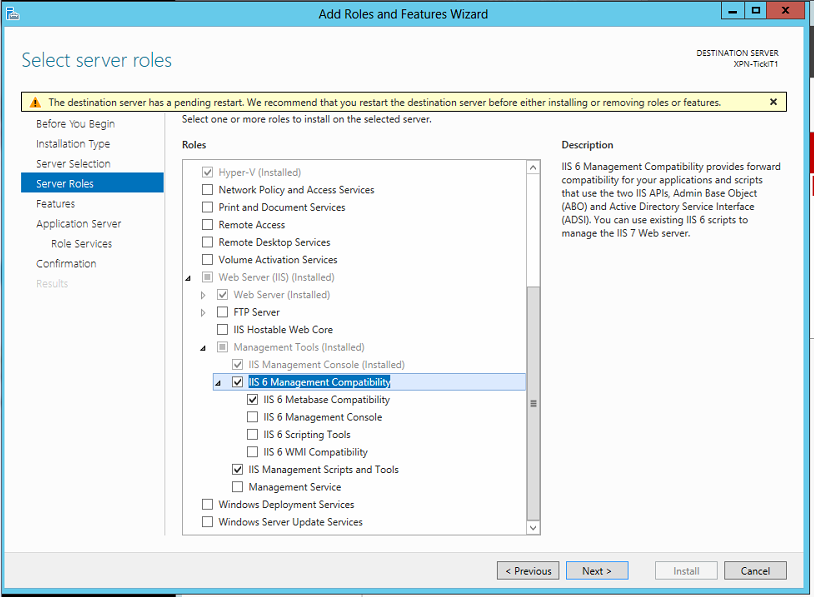
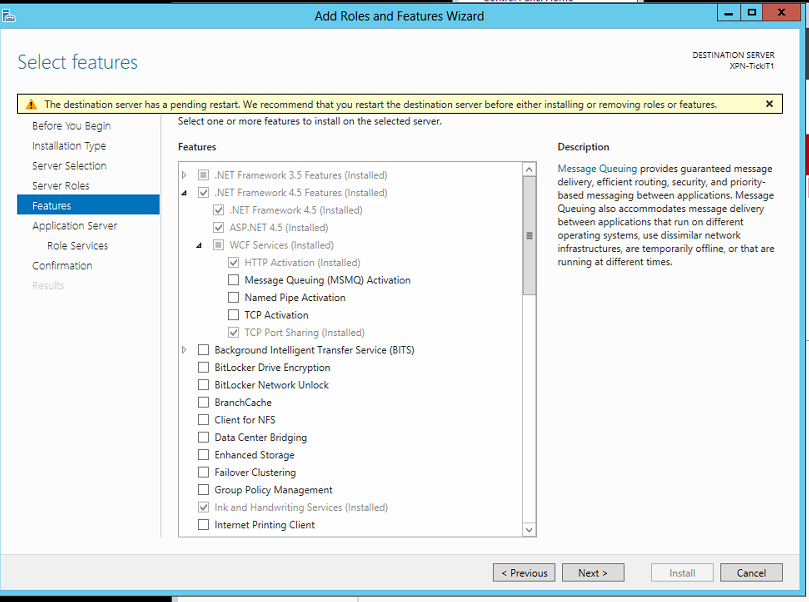
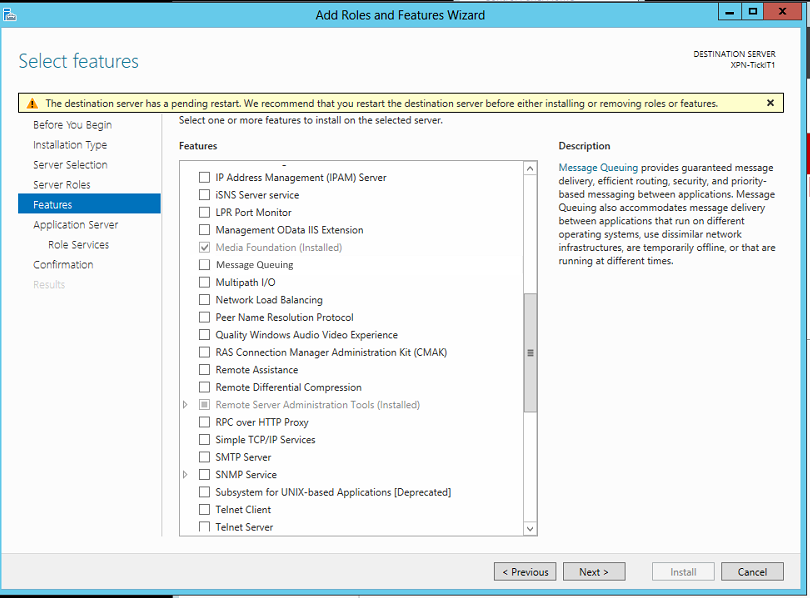
Step 1 & 2 - WINDOWS SERVER - Open Server Manager. Click on Local Server.
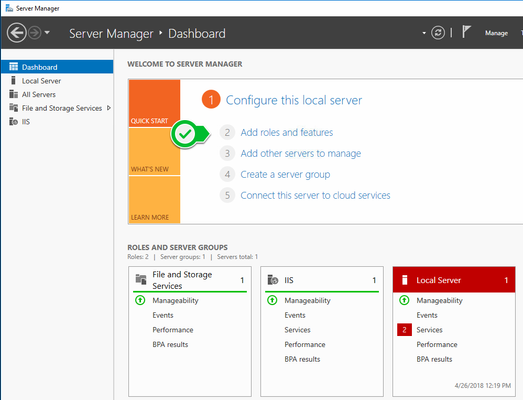
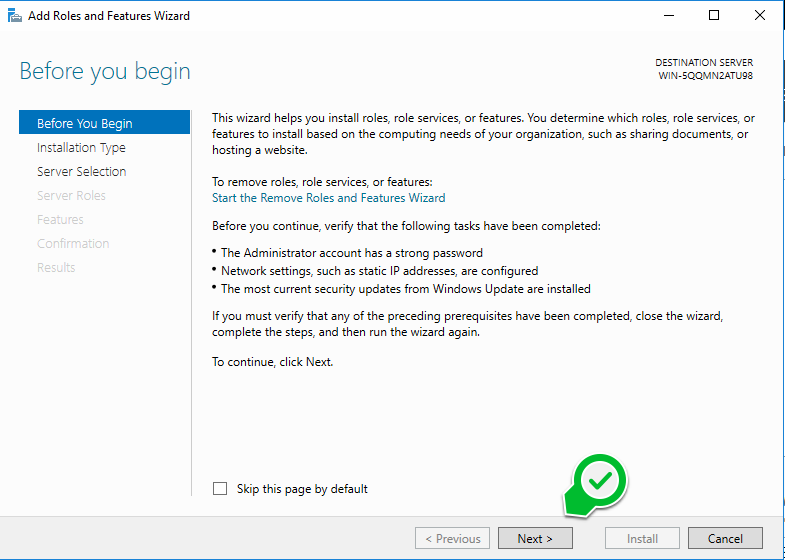
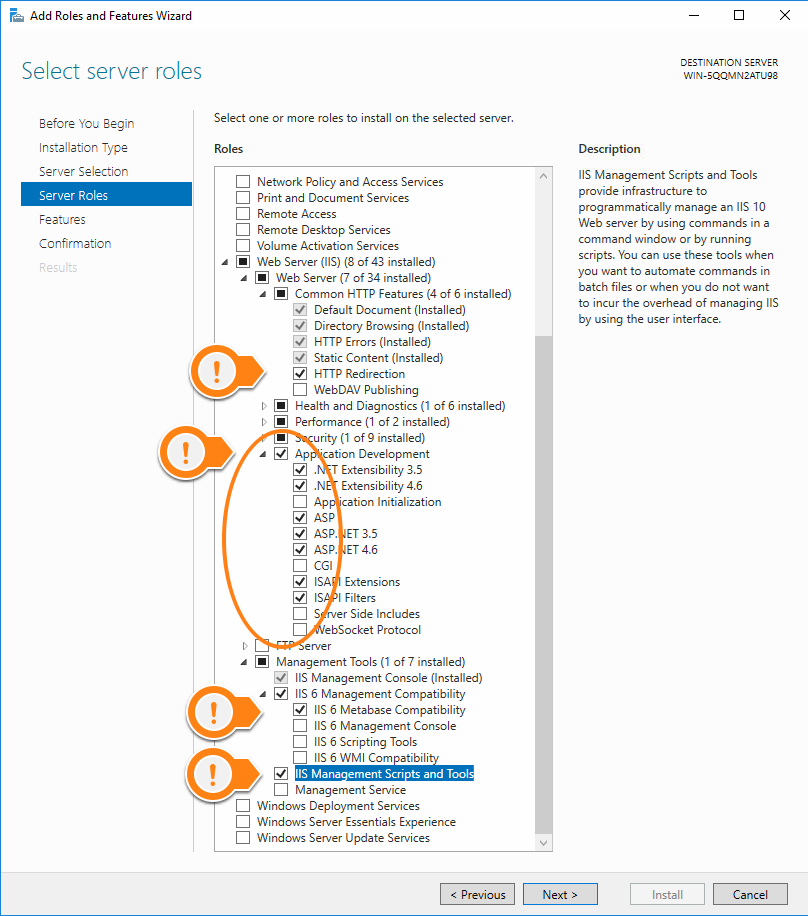
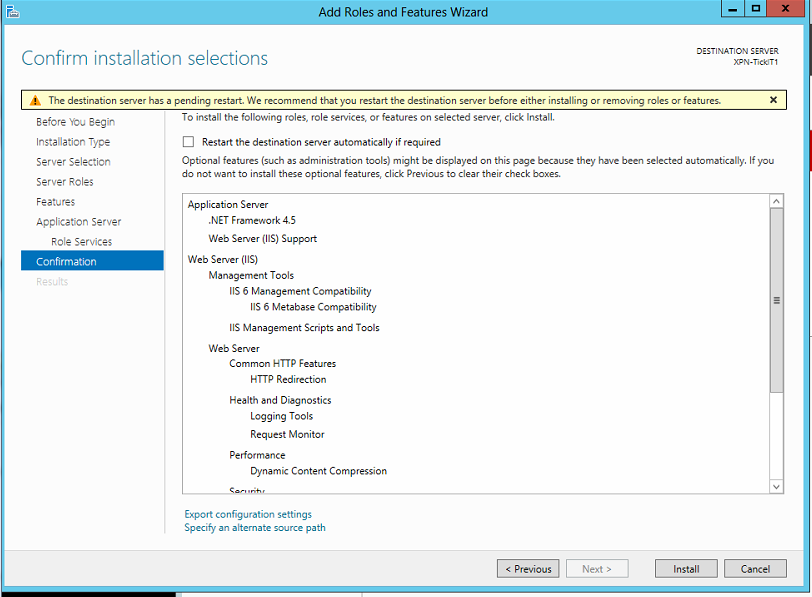
Step 3 - Ensure the following marked options are enabled or Roles and Features are enabled
- NET Framework 4.5
- Web Server IIS Support
- Management Tools
- IIS 6 Management Compatibility
- IIS 6 Metabase Compatibility
- Performance
- Static Content Compression
- Dynamic Content Compression
- Http Activation
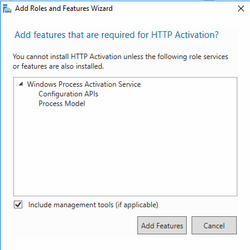
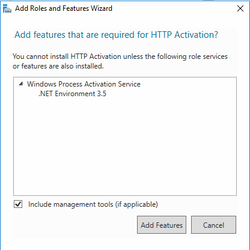
As you select features confirmation dialogs will pop up confirming the components this feature requires. You can accept them all, expand the link below if you would like to see them.
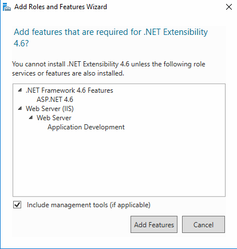

As you select features confirmation dialogs will pop up confirming the components this feature requires. You can accept them all, expand the link below if you would like to see them.
- NET Framework 4.5
- Web Server IIS Support
- Management Tools
- IIS 6 Management Compatibility
- IIS 6 Metabase Compatibility
- Web Server
- Performance
- Static Content Compression
- Dynamic Content Compression
- Performance
- Http Activation
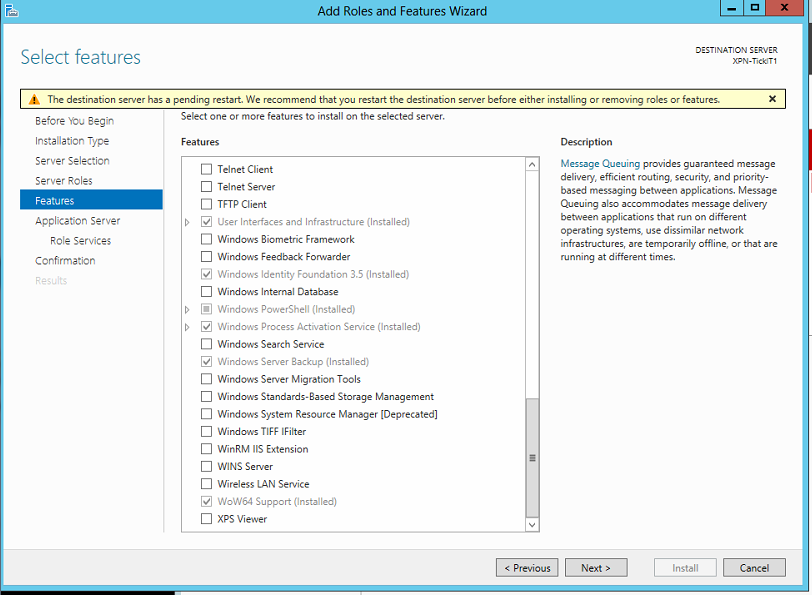
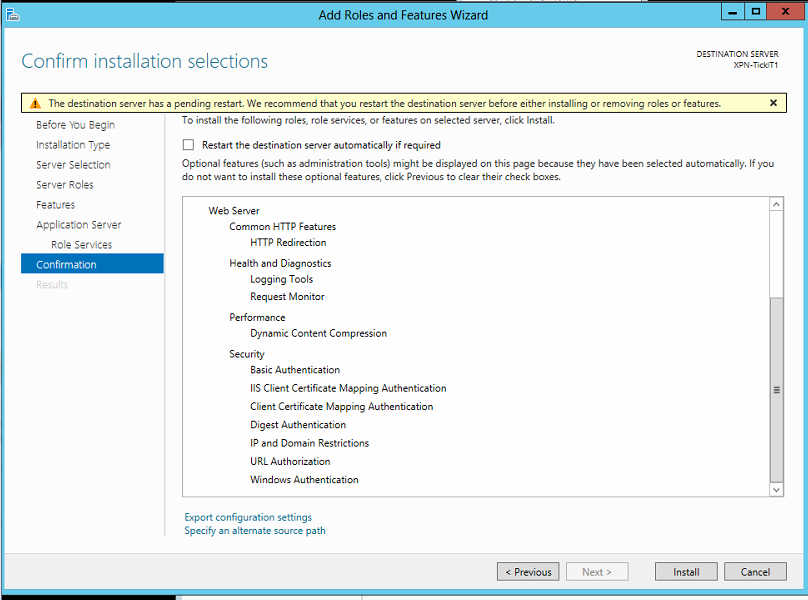
Step 4 - Click OK
Configuring IIS
Step 1 - In the Control Panel, open the Administrative Tools
Step 2 - Open the IIS Management Control
Step 3 - Click on the top node
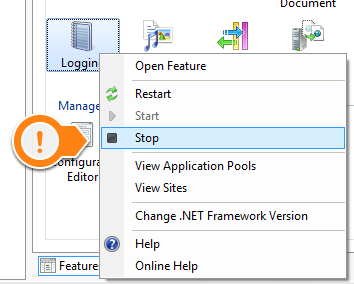
Step 4 - Right click on logging for IIS
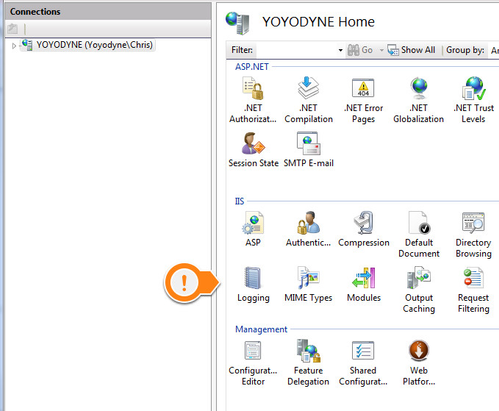
Step 5 - Disable this as it is not needed for internal systems.
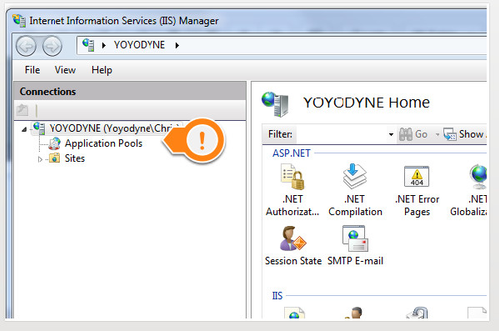
Step 6 - Expand the top node
Step 7 - Click on the Application Pools node
Step 8 - Find the DefaultAppPool

Step 9 - Double click on this and set the .NET Framework to v4.0.xxxxx
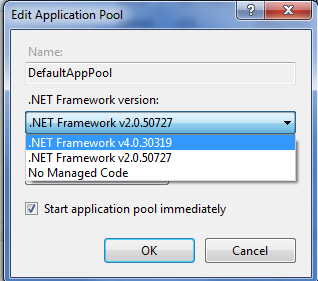
Step 10 - Click [OK]
Note
If you have more than 1 product installed on the same system (ie. Brando, Super Ticker, Chameleon, etc.), it is a good idea to create an Application Pool for each application.
Your IIS is now configured and you are ready to continue with installation of your product.
Step 11
You may also need to enable/start the World Wide Web Publishing service on the server before the site will be accessible.

Installing Oracle MySQL Database Server
The following steps will take you through a MySQL Database installation. This step should precede Flow, player and utility installation.
Step 1 - Obtain the Oracle MySQL installation package. The Bannister Lake recommended install package is available here:
MySQL 8
https://bannisterlake.com/dl/installs/Server-Install-Kit/mysql-installer-community-8.0.35.0.msi
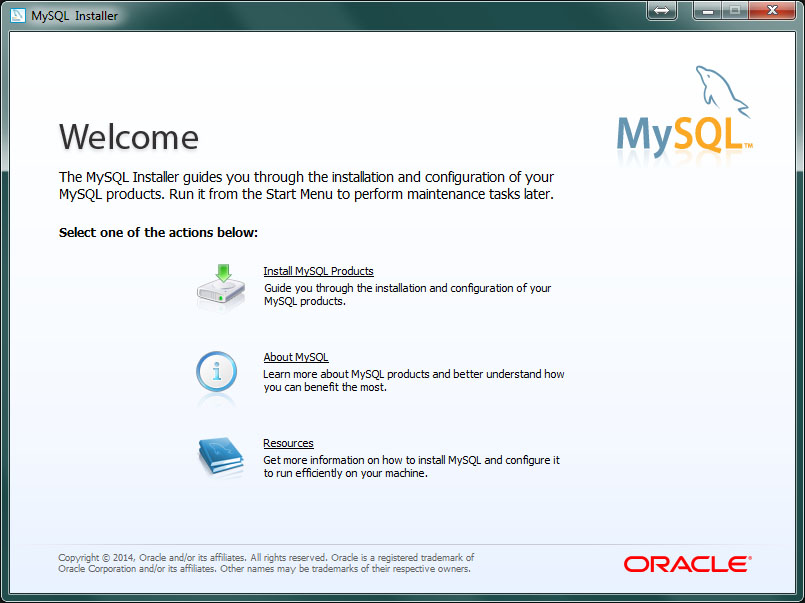
Step 2 - Launch the installer and proceed with the steps below.
Step 3 - Choose the "Install MySQL Products" link.
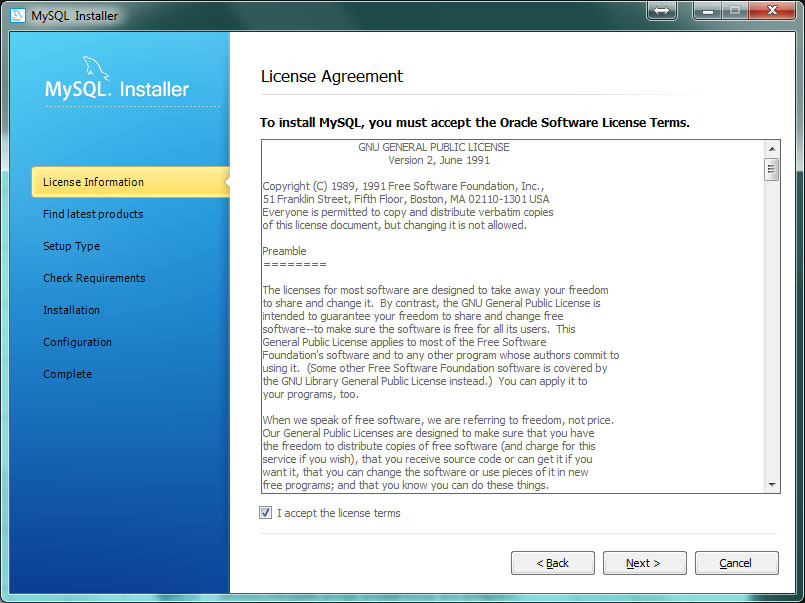
Step 4 - Accept terms and click "Next".
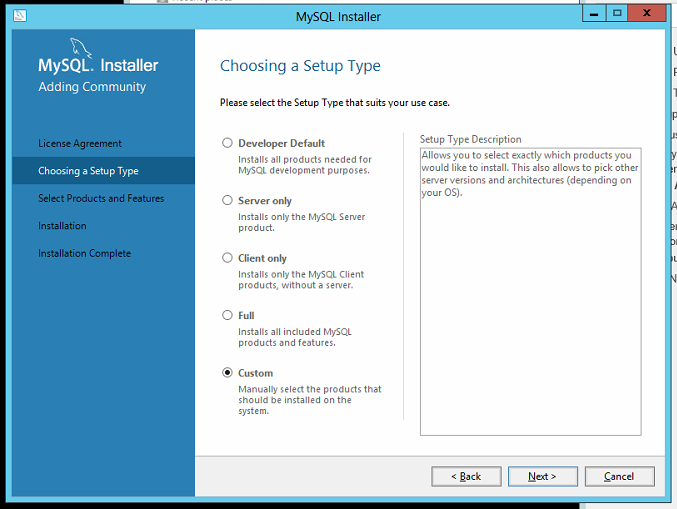
Step 5 - Choose the "Custom" option then click "Next".
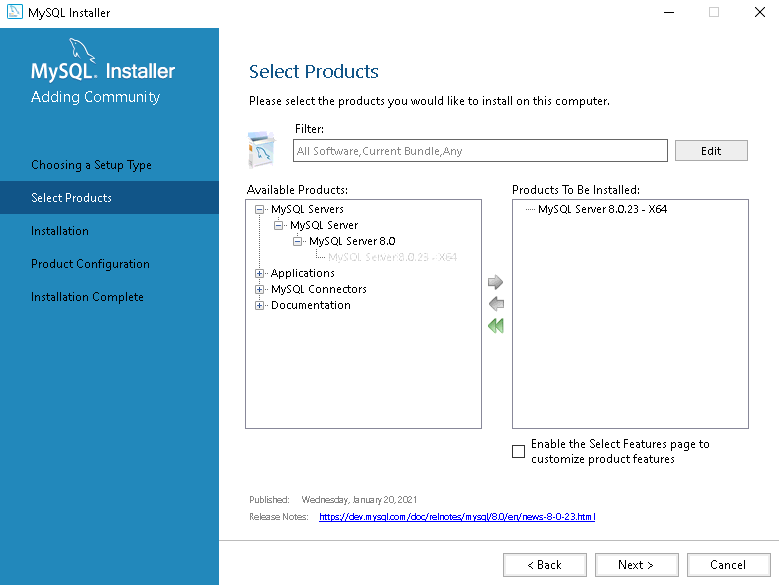
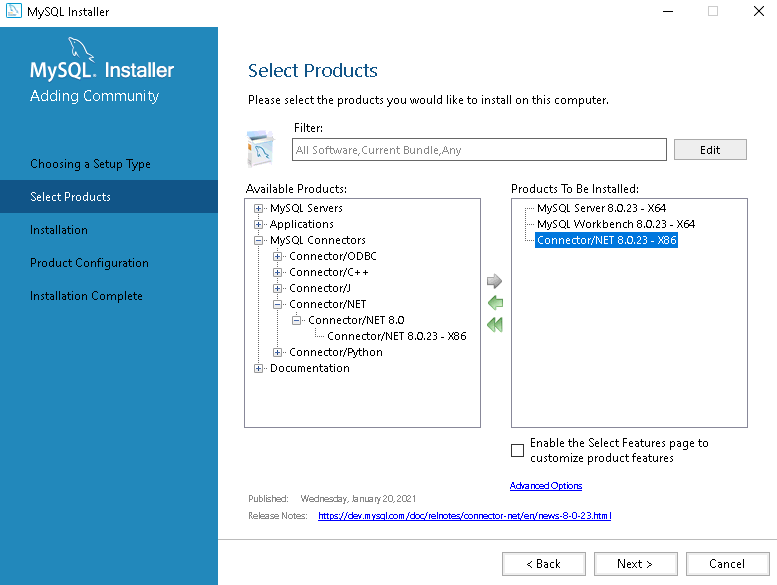
Step 6 - Open/expand the tree view (click on the plus '+' symbol) until you see the 64 bit version of MySQL (should be 'MySQL Server 5.6.21 - x64'). Move it to Products/Features To Be Installed by clicking on the arrow pointing to the right. This item should now be in the right hand column labeled "Products/Features To Be Installed:" as shown below.
Step 7 - Repeat expanding the tree under 'Applications' and add MySQL Workbench (x64) to the install list on the right had side.
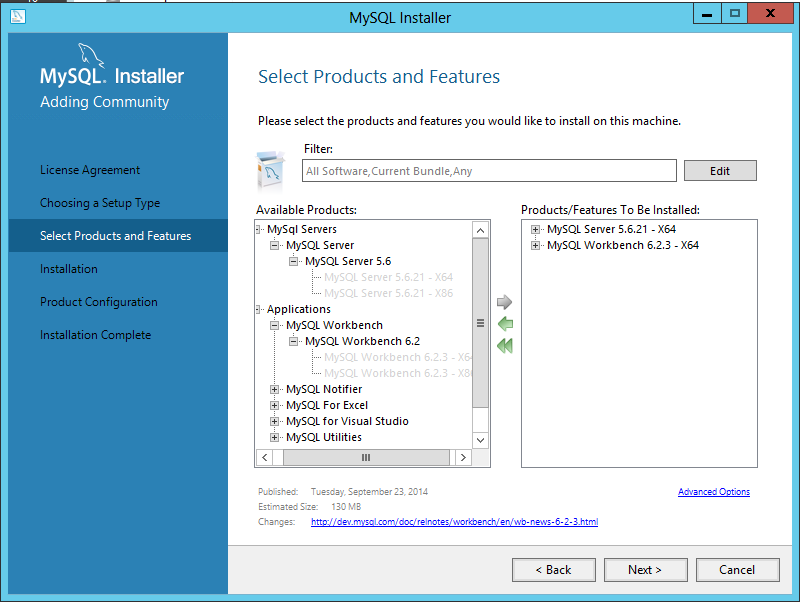
Step 8 - Repeat expanding the tree under 'MySQL Connectors' and add Connector/NET (X64) to the install list on the right had side.
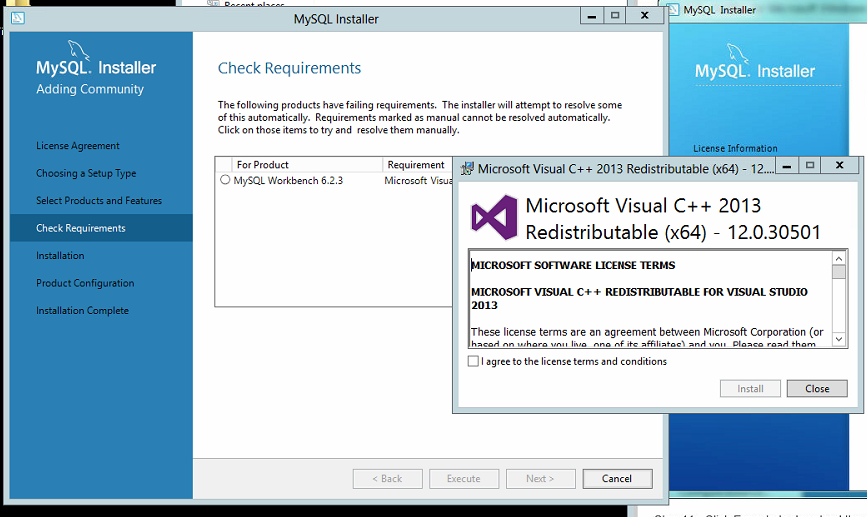
Step 9 - Click "Next" to proceed with the requirement check and install as recommended (using the "Execute" button).
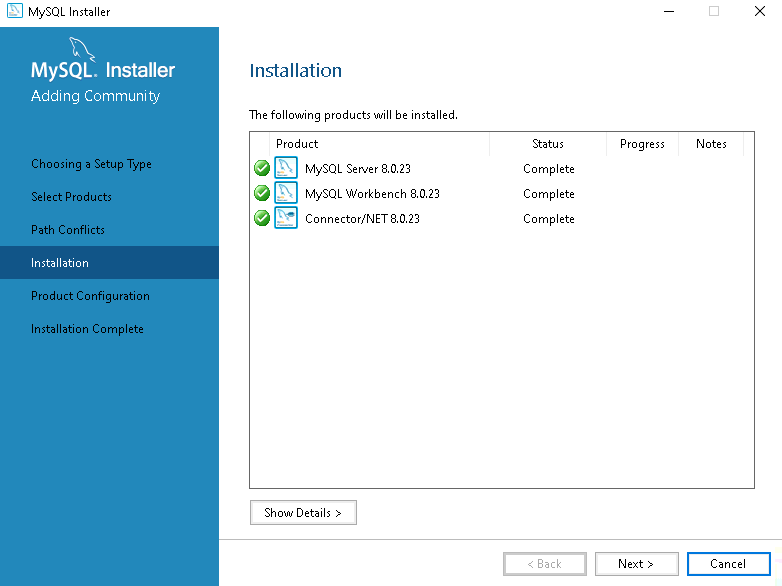
Step 10 - Proceed with the database installation. Click "Next".
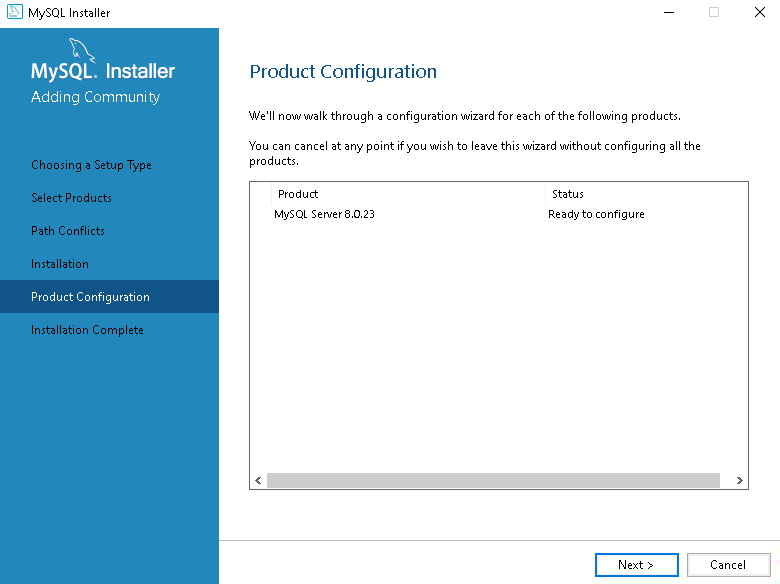
Step 10b - Click “Next” to Configure.
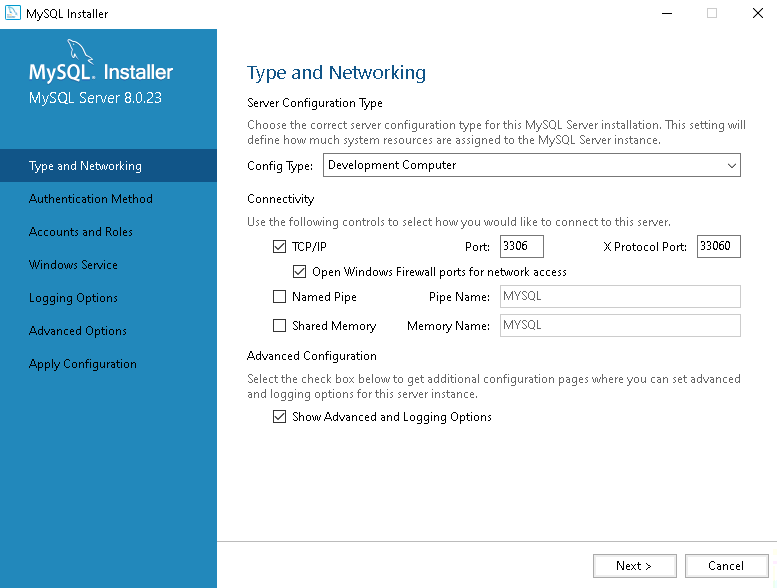
Step 11 - Ensure the "Open Firewall port for network access" is chosen as well as "Advanced Configuration". The Advanced Configuration options will show up as additional dialogs as you proceed through the next configuration steps. Click "Next".
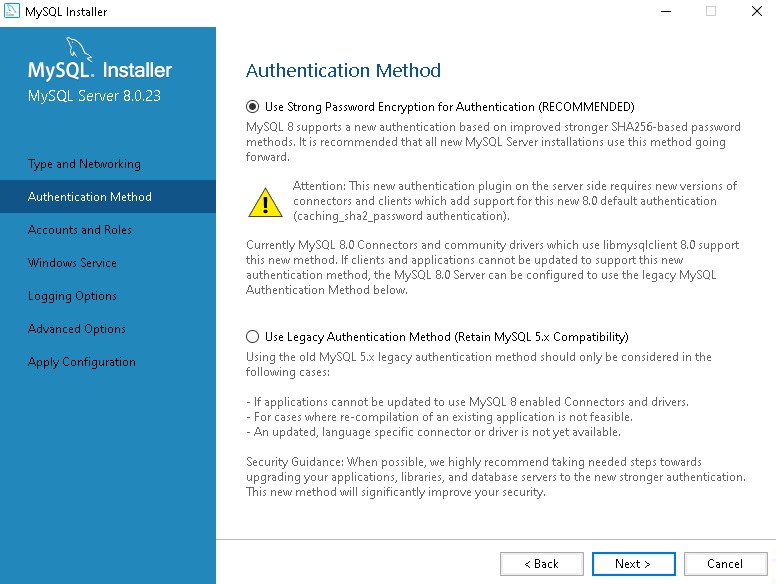
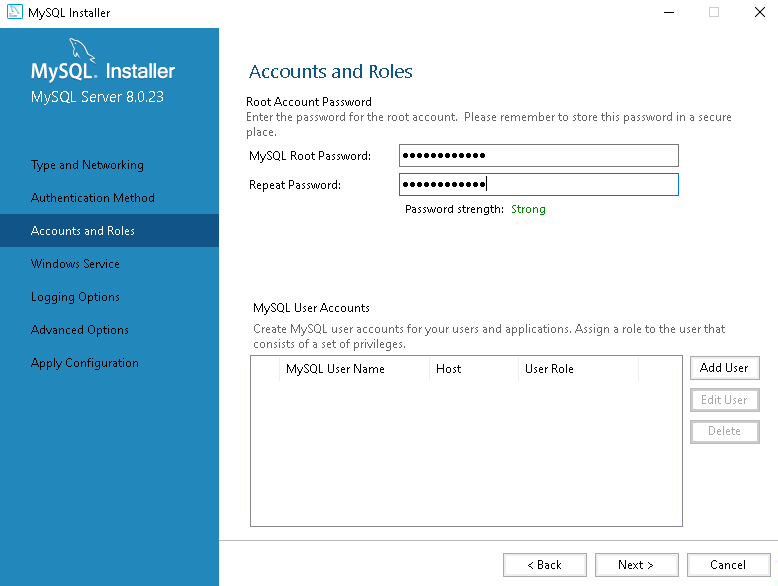
Step 12 - Use the default or recommended ‘Authentication Method’ and click “Next”. Then create a strong password. Save this password in a secure location. Your software provider CAN NOT retrieve this password for you. Click "Next".
Recommended: create a root user account with full dba privileges and specify the host as the machine name or IP address that supporting apps on other machines will be able to use to access this database. If you aren't able to do this now - you can do it later in the post-database setup phase before installing Flow.
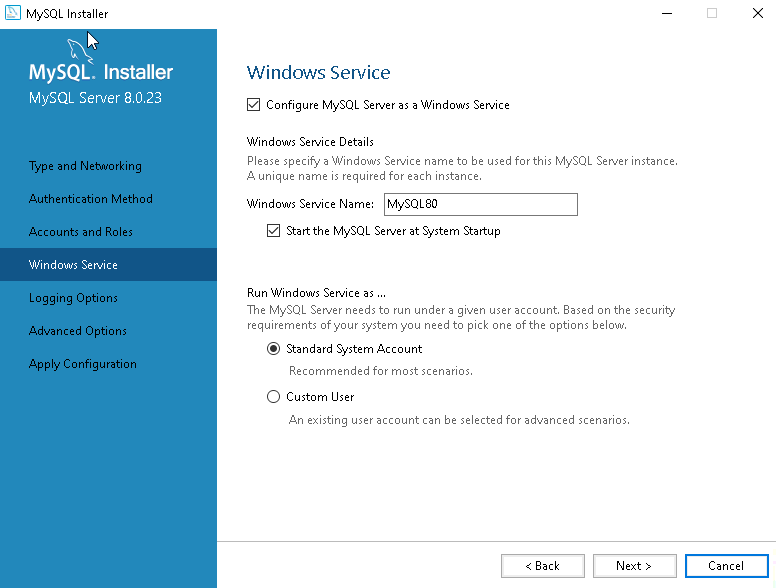
Step 13 - Ensure the "Start MySQL Server at System Startup" is enabled and click "Next".
Step 14 - Chose which option applies to your configuration:
Single server (ie. no backup server connected):
The defaults can be left for this dialog (Bin Log is disabled or unchecked)
Dual server (ie. Primary & Backup):
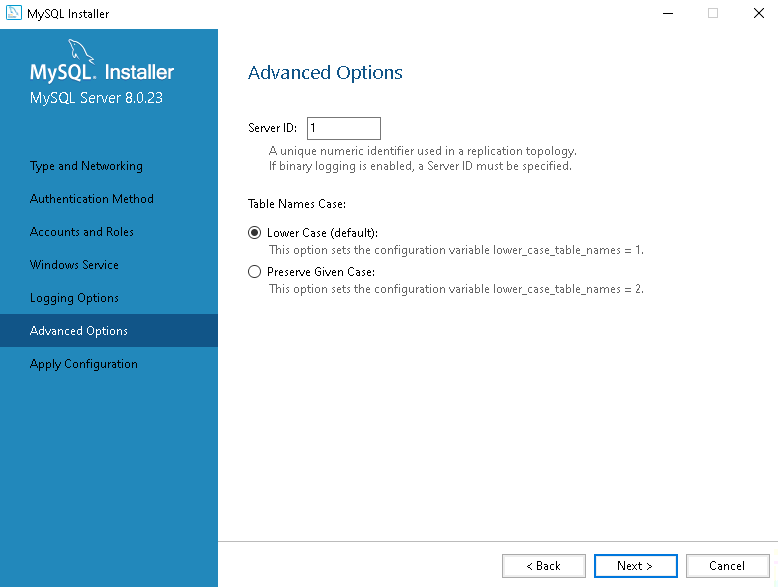
Primary Unit - Enable "Bin Log" and click “Next” and set the "Server Id" value of 1.
Backup Unit - Disable "Bin Log” and click “Next” and set "Server Id" to any value other than 1 (ie. value 2 and up).

Use default “Lower Case” table names:
Click "Next".
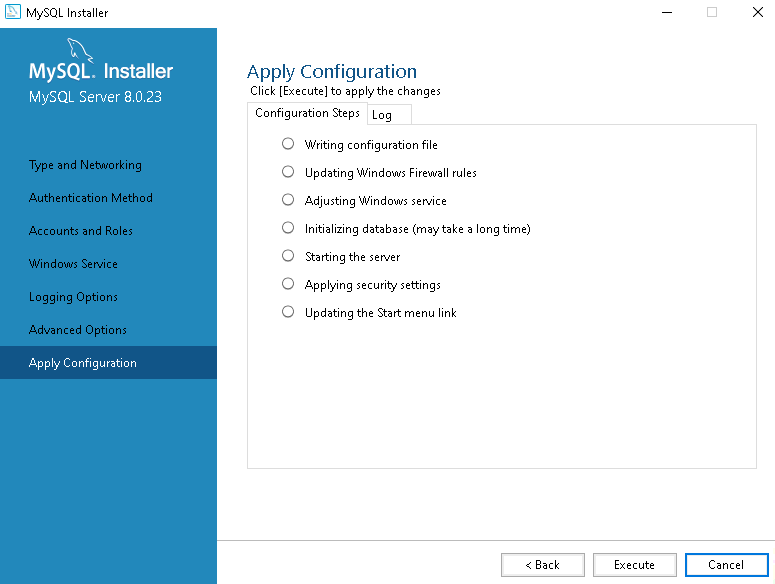
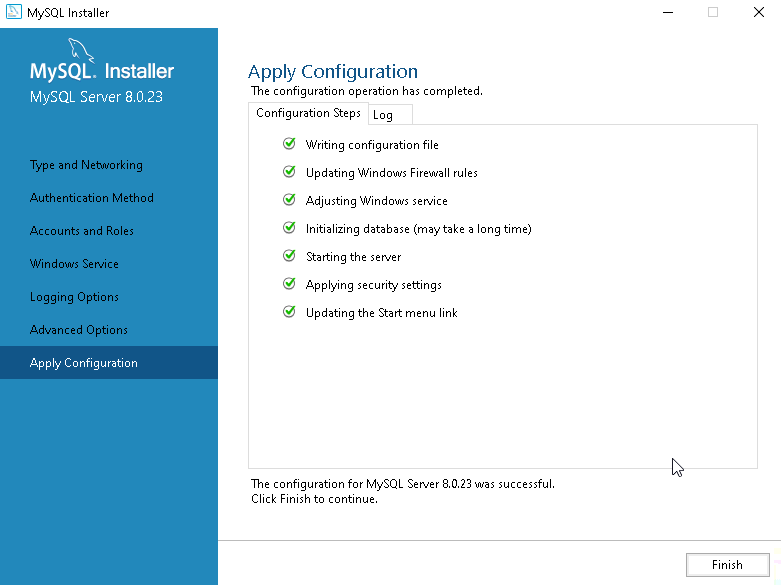
Step 15 - Proceed to install the product. Click "Execute".
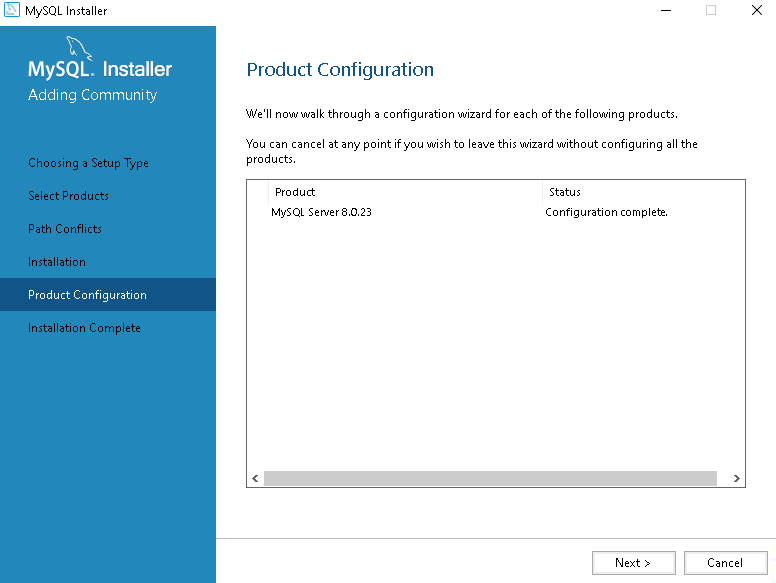
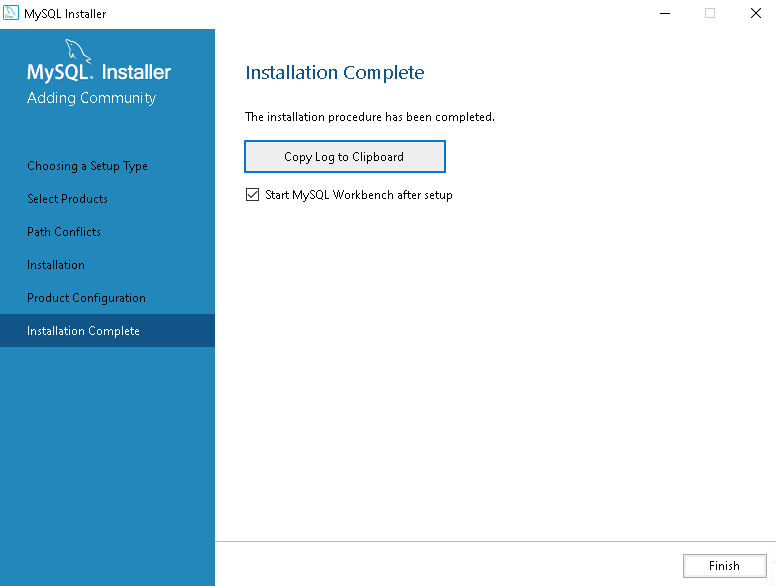
Step 16 - Allow the MySQL Workbench to launch so it can be configured. Click "Finish".
Step 17 - Click “Next” to configure:
Step 18 - Click “Finish” and enable or start launch workbench after setup.
Step 19 - Test MySQL. When MySQL Workbench opens, double click the "Local Instance" and enter the strong password created in Step 12. Enable the Save Password in Vault option and click "OK". This will ensure the database is running.
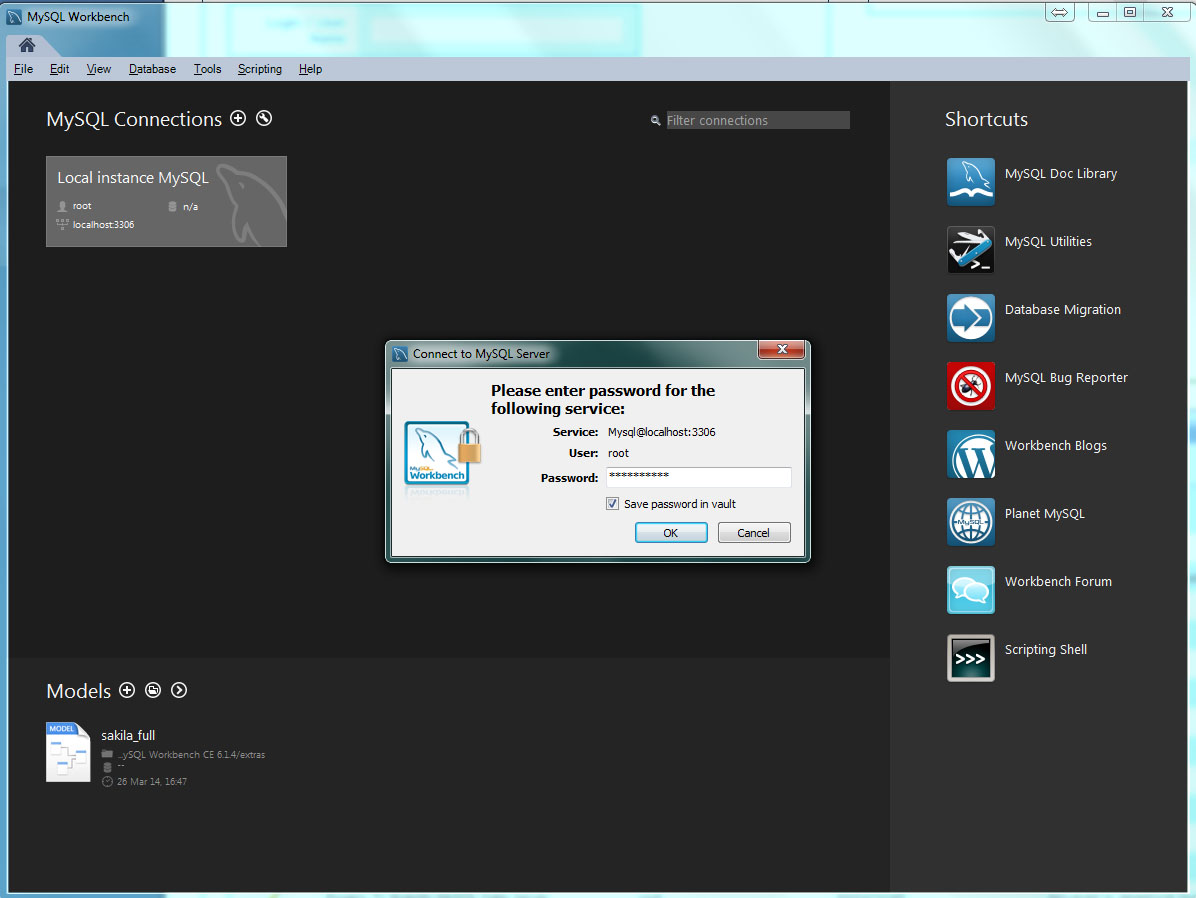
If you have successfully installed MySQL this will now connect to your database.
Post-Install Configuration
MySQL User
If you didn't do this already - create a root user account with full dba privileges and specify the host as the machine name or IP address. The use of the defined IP address or machine name is to allow supporting apps on other machines to use to access this database.
In the my.ini file add/update these settings as per below: (try to find them in the file and if they don't exist then add them).
This file is often located here: C:\ProgramData\MySQL\MySQL Server 8.0\my.ini
DO NOT use the default Notepad app in Windows to edit the my.ini file. It messes things up somehow and then the MySQL service won't restart. Recommend something like notepad++
Using RDS
When using RDS you have to create/use an RDS parameter group to set these kind of parameters (this can be done from the RDS dashboard on the web),
Example:
set log_bin_trust_function_creators to 1 (as opposed to <engine-default>
save the parameter group.
Then modify your RDS instance to use this parameter group if it isn't already, save, and reboot your RDS instance and it should work.
[client]
default-character-set=utf8mb4
[mysql]
default-character-set=utf8mb4
[mysqld]
character-set-server = utf8mb4
collation-server = utf8mb4_unicode_ci
# log_bin_trust… deprecated in version 8.0.34 as well as bin_log_format
log_bin_trust_function_creators=1
lower_case_table_names=1
Recommended: change the setting of lower_case_table_names from the docs: `If you are using InnoDB tables, you should set this variable to 1 on all platforms to force names to be converted to lowercase. This should be the mySQL install’s default setting.
Check the max_connections and see if this value will be sufficient for your environment. Default is 151.
max_connections=151
It is recommended that you increase the value of the max_allowed_packet and innodb_log_file_size variables. The default values may be as small as 4MB and 48 MB respectively but this may be insufficient for you use if you use larger media files.
For versions 8.0.2 and earlier the max_allowed_packet default was 4MB.
For versions 8.03 and greater the max_allowed_packet default is 64MB.
The max value for max_allowed_packet is 1G (or 1024 MB)
max_allowed_packet=160M
For versions before 8.0.30
The innodb_log_file_size should be at least 10 times bigger than the largest row.
If the innodb_log_file_size is too small when you try to upload an image - it will fail when you try to save it.
You can change this by opening the correct my.ini file for the database, finding and changing this value - then restarting the MySQL database.
Example:

innodb_log_file_size=1920M
For versions after 8.0.30
The innodb_redo_log_capacity variable supersedes the innodb_log_files_in_group and innodb_log_file_size variables, which are deprecated.
Example:

innodb_redo_log_capacity=2048M
# MySQL 8 - leave this off because it causes an error in some situations: "Guid should contain 32 digits with 4 dashes" when trying to open the connection
# skip-character-set-client-handshake
Disable Automatic Catalog Update Downloads
We can disable the automatic catalog updates because they aren't typically necessary for our use. The catalog can be manually updated at any time. (But why bother? well for instances where the DB server is not connected to the internet you and/or the client may see the auto-updater reporting a failure to download the catalog. We don't really need to be handling support calls for this unnecessarily.)
This link should provide accurate information. https://dev.mysql.com/doc/mysql-installer/en/mysql-installer-catalog.html
However if it is unavailable some of the details have been copied below.
MySQL Installer stores a MySQL product catalog. The catalog can be updated either manually or automatically, and the catalog change history is also available. The automatic update is enabled by default.
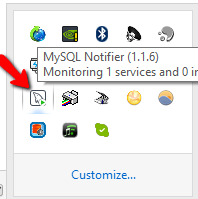
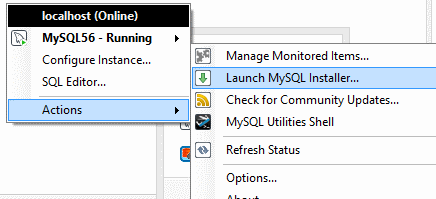
To launch the installer - one way that may be available to you is to use the MySQL Notifier tasktray icon action menu:
Manual updates
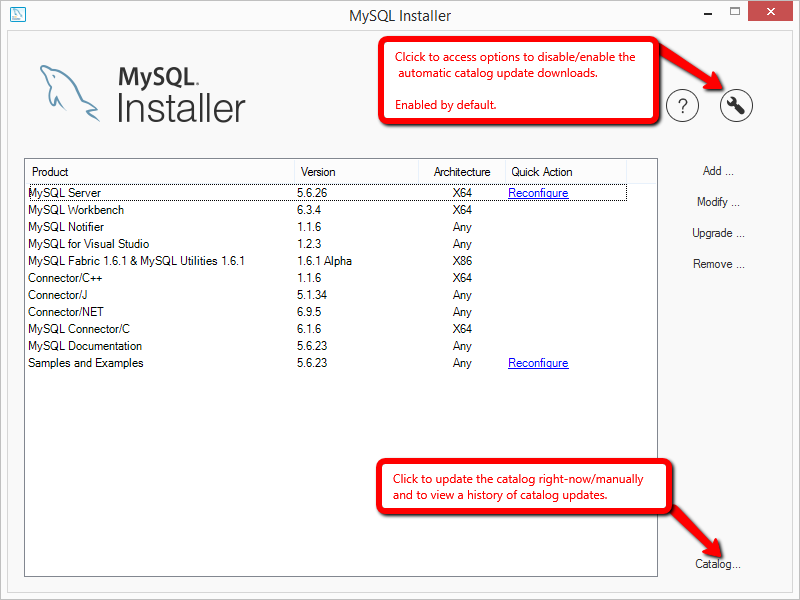
You can update the MySQL product catalog at any time by clicking Catalog... on the Installer dashboard (bottom right as seen below).
Automatic updates
MySQL Installer can automatically update the MySQL product catalog. By default, this feature is enabled to execute each day at 12:00 AM. To configure this feature, click the wrench icon on the Installer dashboard. (seen top-right in image above)
The next window configures the Automatic Catalog Update. Enable or disable this feature, and also set the hour.

Installing Brando
The following article will guide you through installing your BL web based content management software.
Installing Your Brando Web Based Content Management Software
Obtain the installer from the following location - http://bannisterlake.com/dl/installs/Brando/Flow/
The installer package will be named as follows - FlowForBrandoInstaller_6.X.XXXX.msi
Starting the Install
STEP 1 - Double click the MSI package to begin the installer.

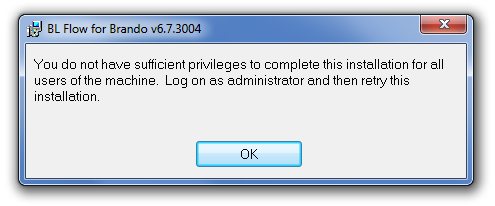
Insufficient Privilege Error
If you receive the message below, download the matching setup.exe from the folder listed above. This additional installer component will assist in launching with elevated privilege levels.
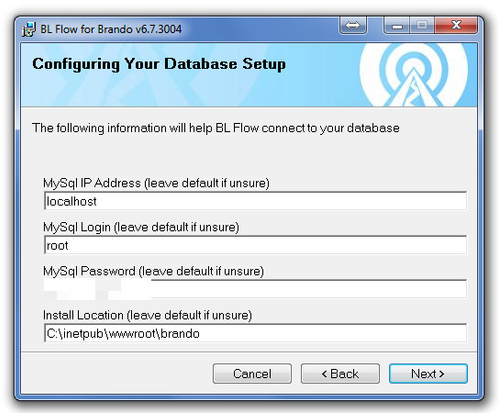
Step 2 - Proceed with the values provided by BL. The default install values are usually fine unless you have been setup with a non standard install. Be sure to set your MySQL password as was defined during the MySQL setup.
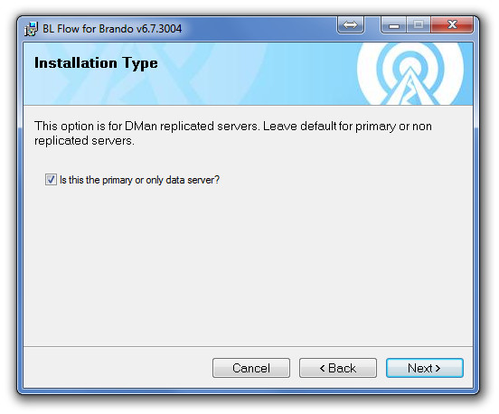
Step 3 - If this is your primary or first Brando server, leave this enabled.
Important Setting For Backup Server
When installing or updating a backup server with the Flow package you must un-check this box or you will need to re-synchronize your backup server database manually to resume synchronization.
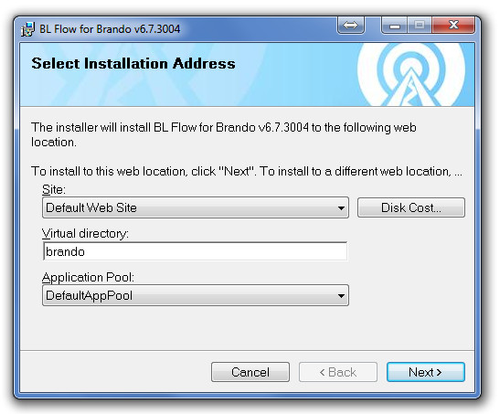
Step 4 - Unless specific changes have been made to your server, the default values for the Installation Address dialog are acceptable.
Step 5 - Proceed through the rest of installation clicking the Next buttons.
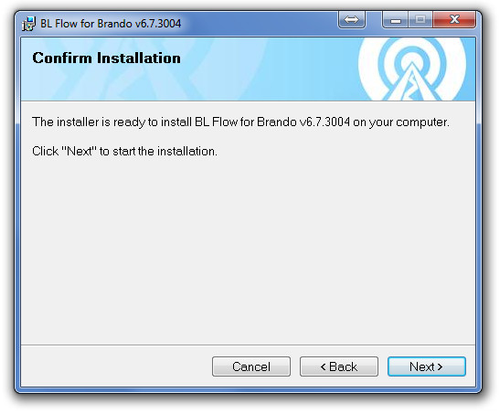
Step 6 - Continue through the steps until the installation is complete.
Testing Your Brando Install
While still on the server, open a browser and enter http://localhost/brando to launch the Flow installation. If the login page for Brando shows up you have successfully installed Brando.
If this is the backup Brando server you will receive a "Brando database unknown" error. This is to be expected. The check box you unchecked during install made sure no database was installed and is intentional. The backup database is obtained when you follow the steps on old Running A Backup Server for Bannister Lake Products with DMan Backup
Common Install Errors
ISSUE #400 - Server Error in 'XXXXXXXX' Application. Unrecognized attribute 'targetFramework' ?
See this troubleshooting article.
Brando database unknown?
If this is the backup database, this is normal operation. Proceed through the old Running A Backup Server for Bannister Lake Products with DMan Backup steps and then try again. Remember, do not log in in on the backup server or you will have to re-export and import the database.
You have successfully installed Flow for Brando,
DEPRECATED
These post-install setup steps are no longer necessary for Brando Flow versions 8.5.3.2 or greater. The installer itself will do this.
Configuring Your BL Web Based Content Management Package
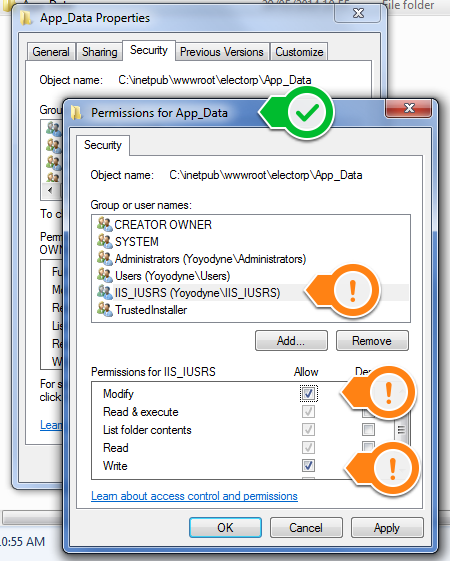
Setting Special Folder Permissions
One folder needs to have special access permissions set manually. Follow the steps below to change permissions.
Step 1- Navigate to c:\inetpub\wwwroot\brando. Right click on the APP_DATA folder and change permissions on two directories by right clicking on the properties.
Step 2- Navigate to the SECURITY TAB and click the EDIT BUTTON. Select the IIS_USER User Name and then check the ALLOW MODIFY checkbox. Click OK. Close all dialogs.
Configuration is complete!
Installing DMan
The latest DMan can be found here:
http://bannisterlake.com/dl/installs/DMan/
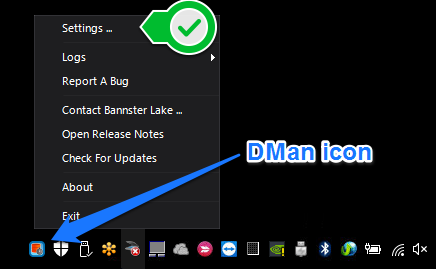
After the install has completed you should see the DMan icon in the Windows taskbar. Click on the icon to open the menu and select 'Settings' as shown below.
Confirm that in the 'Subscription Name' your URL or Flow install is listed and the status is 'OK'

Configuring A Backup Server
Troubleshooting
Once complete, you should be able to access Flow at http://localhost/brando and connect to the database from the player application using the IP of your server.
If you do have problems check out our standard setup troubleshooting guide or contact us at support@bannisterlake.com
|
|