Creating a broadcast for election day includes preparing rundowns. They define what scenes you want to show and in what order. Rundowns can be organized together using bins and then used Chameleon Election Player for quick and easy access.
You manage the bins and rundowns in Flow using the Election Rundown Module.
There are two primary components to Election Rundowns - Scenes and Content.
| Table of Contents | ||
|---|---|---|
|
Scenes
The scenes or templates are the base graphics that are filled and then displayed with live election results.
Where do scenes come from?
The scenes are added to the list by the Chameleon Gears app using the Election component. This app reads the graphics project (XPression) and then adds the scene information to the database for Flow to display in the Election Rundown module. This app is run to add new scenes and to update existing ones with any changes made.
Scene Types
There a number of different types of scenes that are supported. They include:
Contest (Riding)
Choice (Candidate)
Party
Others
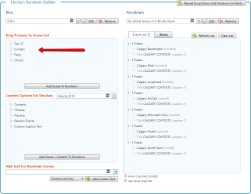
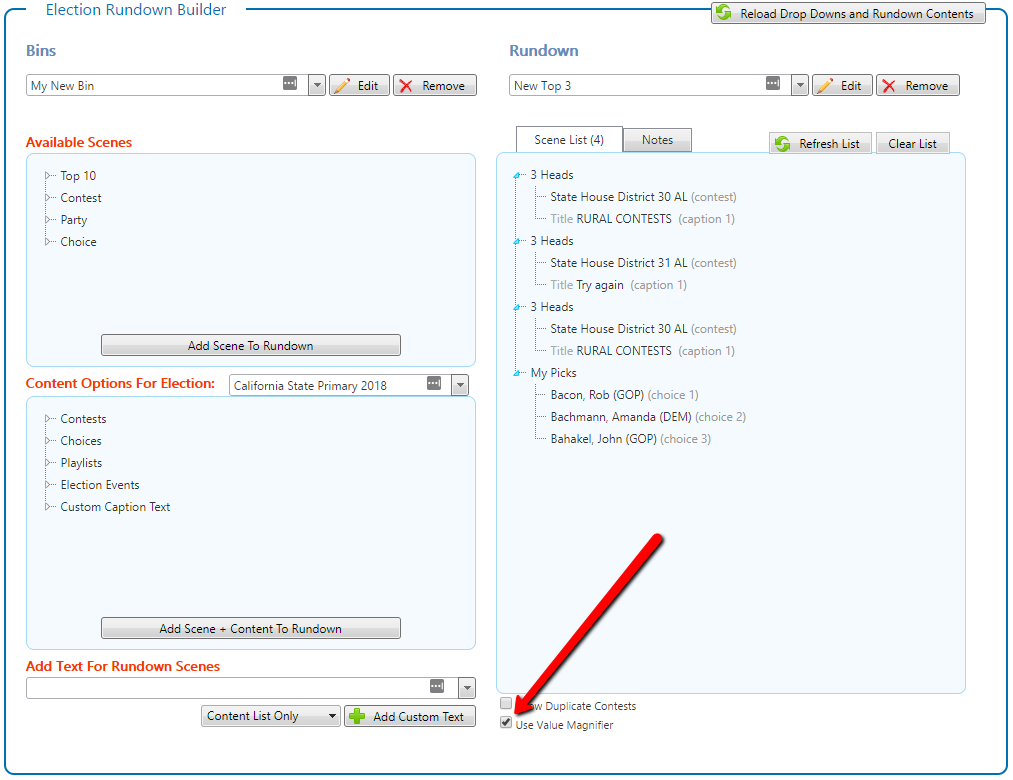
The list of scenes is grouped by type and displayed near the top left as indicated in screenshot.
Contest Based Scenes
Contest scenes are used to display summary election results for the leaders in a contest. Their content is defined by assigning a contest to the scene. They would display some contest specific data such as
Contest Name
Total polls
Polls reporting
In addition, the scene would typically include data for each leading choice such as:
Names
Votes
Vote Percent
Party (if applicable)
Choice Based Scenes
Choice scenes are used to display election results for specific choices that may or may not all be in the same contest for the election. This allows you to view the results of specific choices such as celebrities running in the election or party leaders. They would typically include a header or title as well as details for each choice:
Names
Votes
Party (if applicable)
Party Based Scenes
Party scenes are used to display summary data aggregated by parties. These can include charts and maps.
Find Scenes in the List
The scenes you’ve used the most will display in the Top 10 category at the top of the list.
You can also filter the list by using the search box in the top right corner of the list. It will highlight the sections of the list that contain matching scenes by name. To return to displaying all scenes - simple delete any text from the search box.
Content
Election content is pushed into the graphics templates based on your choices from the content types.
Where does the content come from?
Most of the content comes from your existing election data that you have already entered manually or imported from a data source. Custom caption text can be created manually as it is needed.
Content Filtering
The list of available content is filtered first by your content group and then by the selected election. You can also filter the results by using the search box in the top right corner of the list. It will highlight the sections of the list that contain matching results. To return to displaying all results - simple delete any text from the search box.
Content Types
There are a number of content types that can be used in the rundown scenes. The scenes define which type of content is required.
Contests
Choices
Playlists
Events
Custom Caption Text
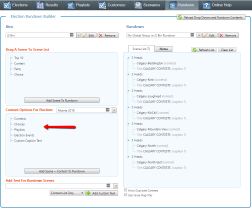
The list of Contests and Choices are automatically populated by your existing election data. It appears on the left in the bottom half of the screen as indicated in the screenshot.
Get Started
You can get started creating rundowns once you have confirmed that you have available scenes and content.
Create a Bin
All rundowns need to be stored in a bin. Bins are simply a way of organizing groups of rundowns for easier access when modifying them in Flow or playing then in the Election Player.
To create a new bin - click on the box beneath the Bins label. Type the name of the new bin and press Enter.

Create a Rundown
First you need to assign your rundown a new name. All rundowns need to be stored in bin so you should have already selected one from the bin list. Next click on the box beneath the Rundown label. Type the name of the new Rundown and press Enter. This will clear the current scene list and reload the available content.

Adding Scenes to a Rundown
Next you need to start adding scenes and content to the rundown. There are a few ways to achieve this:
drag-n-drop
select items and click add buttons
use the rundown widget in the Election Results module.
Select Items and Click Add Buttons
There are 2 buttons that can be used to add a selected scene to the current rundown. The first button is found at the bottom of the scene list and the second is at the bottom of the content list.
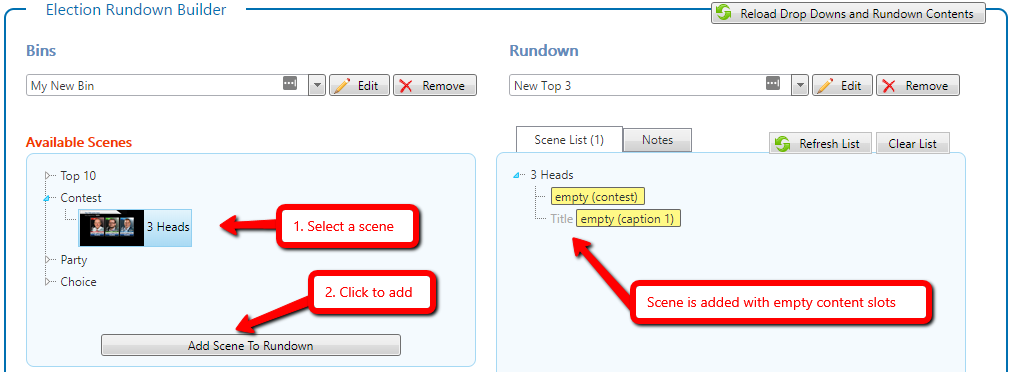
Scene List button - any scene
Select a scene from the available scene list
Click the Add Scene to Rundown button
A copy of the scene will be placed at the end of the rundown. Any available content slots will remain blank.
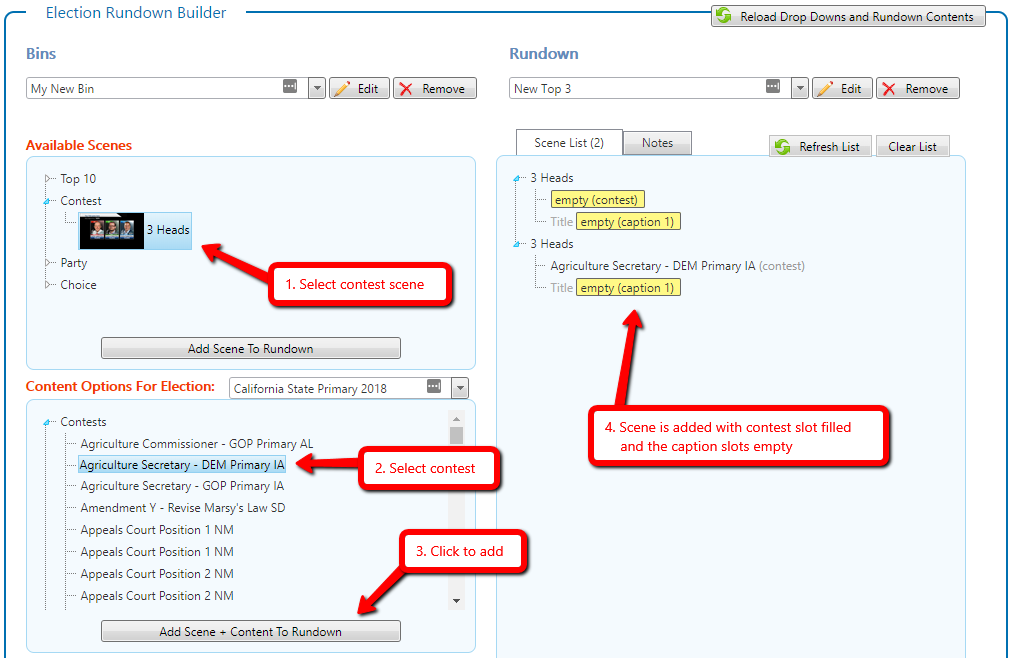
Content List Button - Contest scene + Contest
Select a contest scene from the scene list
Select a contest from content list
Click the Add Scene + Content To Rundown button
A copy of the contest scene will be added to the end of the rundown. The contest slot will be filled with the selected contest. Any caption slots will remain blank.
Content List Button - Contest scene + Choice/Candidate
Select a contest scene from the scene list.
Select a candidate from the choice list.
Click the Add Scene + Content To Rundown button
A copy of the contest scene will be added to the end of the rundown. The contest slot will be filled with the selected candidate’s contest. Any caption slots will remain blank.
Content List Button - more options
If you select a Contest Scene and a Playlist you will get a scene for each contest in the playlist with the contest slot filled and the first caption (or Title caption if it exists) will be filled with the playlist name.
If you select a Choice Scene and a Choice you will see the scene added with the first choice slot filled.
Drag and Drop Scenes and Content
To use drag-n-drop start by selecting a scene from the available scene list on the left. Then drag the scene across onto the selected scene list on the right.
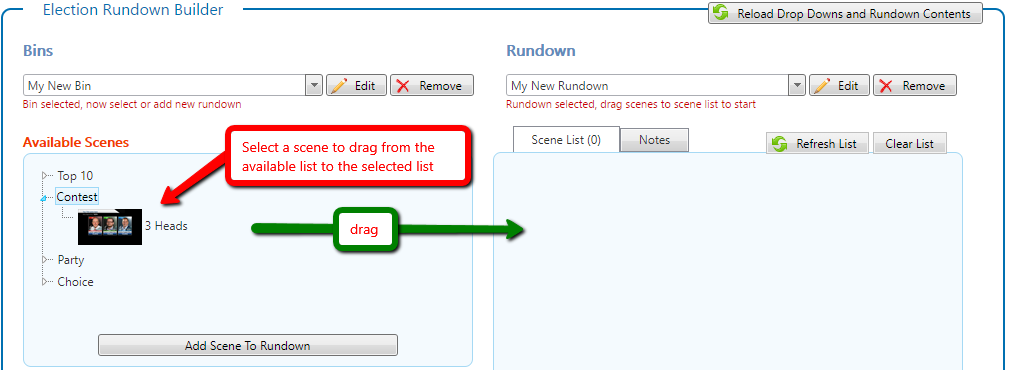
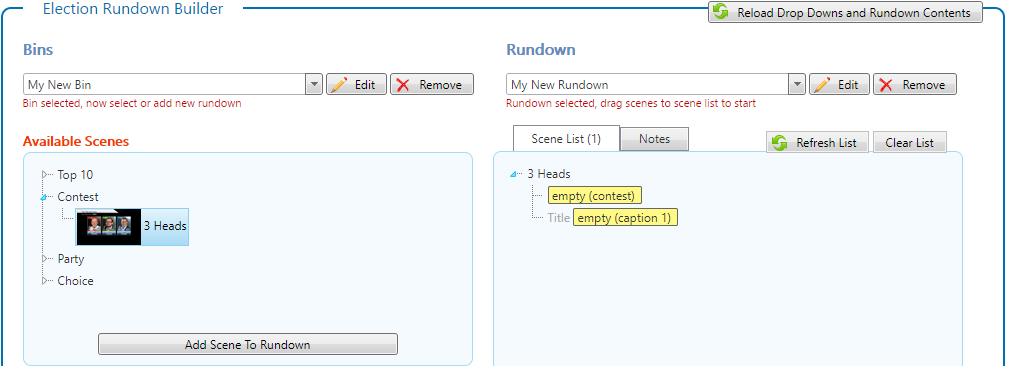
The scene will be added to the selected scene list and available content slots will be highlighted in yellow.
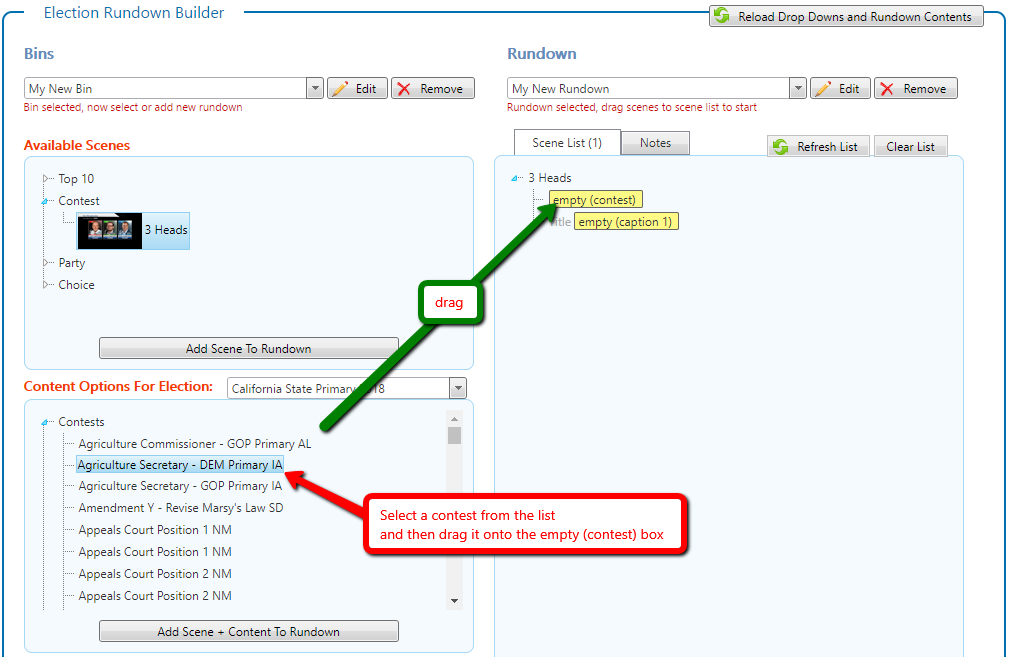
Then you need to add content to the available content slots. Start by selecting a contest from the available content list. Then drag the contest from the list onto the yellow [empty (contest)] box.
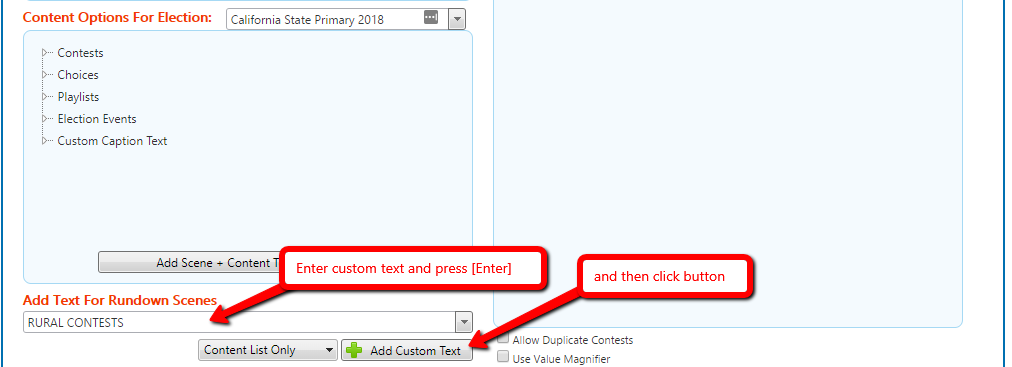
To add text for the Title field of the scene we need to have the text defined and then we can drag it. To add custom text you click on the textbox below the heading: Add Text For Rundown Scenes. Type your text and then go ahead and press [Enter]. Then click on the [Add Custom Text] button. This will add it to the list.
Then expand the Custom Caption text list to see your text. Select it and then drag it onto the Title caption.
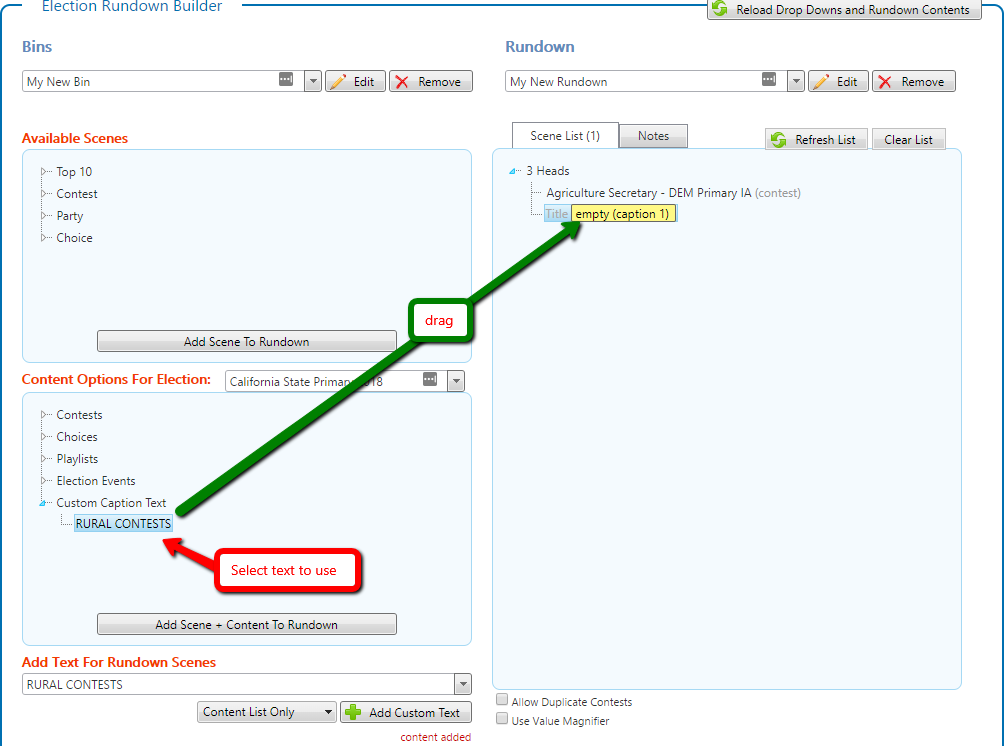
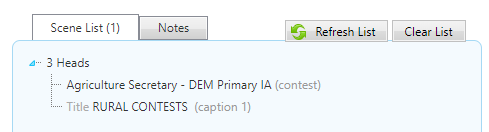
And now your first scene has been completely setup using drag-n-drop methods.
Quickly create a Rundown from a Playlist
Instead of creating the rundown one scene at a time, it is possible to add a scene for each contest in a playlist to a rundown. To do so:
Start by adding a contest scene to the rundown.
Find the playlist in the Content Options playlist section
Drag the desired playlist onto the rundown scene’s contest node.
You will see the scene duplicated for each contest in the playlist
If the scene has a single caption or a caption named Title it will automatically apply the name of the playlist to that caption.
Creating Rundowns From the Election Results Module
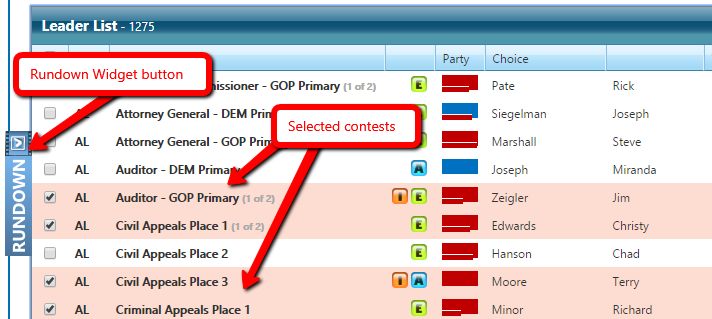
You can easily add, update and create rundowns with contests you select in the Results module. The results module is a natural place to select contest from given it’s ability to filter and sort contests and results. To add contests to a rundown you simply select the contests from the results list and then open the Rundown Widget to assign them to a rundown.
Step 1 - Select Contests
There are a number of ways to select the contests to be included. When you are want to select contest you will need to not click on the Office and Area names (in bold) in each contest row. If you click on the name - it will open the contest details popup and clear any selections.
NOTE: You may find it beneficial to use the results module filtering to find contests you want to select.
Selection options include:
Single Contest
click on the select checkbox in the row in the left hand column of the contest
click anywhere in the row (but not on a name or elect icon)
All Contests
click on the checkbox in the select column header
Groups of Contests
hold down the CTRL key while clicking to select multiple contests
hold down the SHIFT key while clicking to select a range of contest from the last click to the next
Click on a row and drag to select a group of contests together
Step 2 - Open Rundown Widget
Once you have selected one or more contest you can add them to a rundown using the Rundown Widget. Click on the Rundown button that’s on the left margin of the results page:
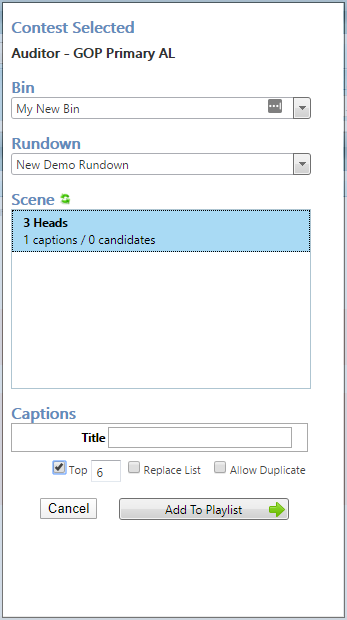
Step 3 - Select Rundown Options
When the widget opens you will need to tell it which bin, rundown, scene and captions to use.
The widget automatically selects the first contest as the default contest to use and displays the name.
You select or create a new bin.
You select or create a new rundown.
To create new, type the name and press Enter.
Once the rundown is selected the scene list will update with the available contest scenes.
Selecting a scene will cause the list of available Captions to be updated.
Fill in the captions with the text you want applied to all of the contest you choose to include.
You can also then specify how many choices the scene should display from the contest.


Scene Default will display the scene’s natural limit
All Choices will use the scene to display all choices in the contest.
Top will display the number of choices you specify in the text box (assuming there are that many choices available in the contest)
If you don’t want to include all the selected contests then you need to do one of:
uncheck the Top checkbox to include only the first selected contest (name displayed above)
change the number in the Top text box to the number of contests you do want to include
Check the Replace List box to remove any existing scenes in the rundown before adding the selected
Check the Allow Duplicate box to skip checking if the contest is already in the list before adding it.
Tips and Features
Removing Scenes and Content
To remove a scene you can drag it out of the rundown back to the scene or content lists.
To remove a scene - right-click on the scene and then click on the Remove Scene menu option.
To remove a content value - right-click on the value and then click on the Remove Value option.
Specifying the number of Choices a Contest Scene Shows
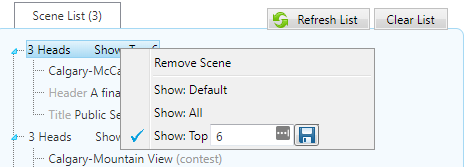
Using the Election Rundown module you can specify how many choices each contest scene will display. The options are:
Scene Default - show as many choices as the scene naturally accommodates.
All Choices - will use the scene to display all choices in the contest.
Top Number - will display as many choices as you specify, one scene full at a time.
To set this you right-click on a contest scene in the playlist and select the appropriate option.

Specifying the Sort Order of Scenes
As of build 13.6.3.1 you can select the sort order of each party and contest scene. If you don’t select one then the default sort order as defined by it’s Event and/or Contest will be used.
To assign a sort order you right-click on a contest scene in the playlist and select the appropriate option.

The sort options are different for party scenes show above and contest scenes.
Party Scene options include:
Results Order (original system default)
Party Order
Party Abbreviation
Party Name
Contest Scene options include:
Results Order (original system default)
Party Order
Party Abbreviation
Party Name
Last Name, First Name
First Name Last Name
Updating Scene Content
Drag and drop content on top of existing content to overwrite it.
Drag content from one scene and drop it in an appropriate slot in a second scene to copy the content, where supported.
You can drag any content type to a caption field. It will apply the visible name/text of the dragged item to the caption.
To update all of the Caption 1, 2, 3, etc values to the value at one time you can type or select the text in the Add Text box. Then select the caption you want to update (example: All Caption 1) and press the Add Custom Text button.

Apply a Choice/Candidate to a Scene
You can drag a candidate to a contest scene and then that candidate's contest will be applied.
If you drag a candidate onto another candidate in the same scene - they will swap locations.
If you drag a candidate from one scene onto a candidate slot in a second scene - the dragged candidate will be copied into the second scene.
Content Slots Too Small?
If you are finding the content regions too small to drag and drop with you can try enabling the Value Magnifier option. Simply check the box for the Use Value Magnifier option at the bottom of the rundown. It will reload and now the selected value will be made larger automatically as you hover over and select items.

Related System Preferences
Election Rundown > Enable Content Magnifier
This preference controls the default setting for the Value Magnifier in the election rundown module.
If true - election rundown content items grow in size when hovered and selected.