| Section | |||||||||||||||||||||||||||||||
|---|---|---|---|---|---|---|---|---|---|---|---|---|---|---|---|---|---|---|---|---|---|---|---|---|---|---|---|---|---|---|---|
Installing Oracle MySQL Database ServerThe following steps will take you through a MySQL Database installation. This step should precede Flow, player and utility installation. Step 1 - Obtain the Oracle MySQL installation package. The Bannister Lake recommended install package is available here: MySQL 8 https://bannisterlake.com/dl/installs/Server-Install-Kit/mysql-installer-community-8.0.35.0.msi Step 2 - Launch the installer and proceed with the steps below. Step 3 - Choose the "Install MySQL Products" link.  Step 4 - Accept terms and click "Next".  Step 5 - Choose the "Custom" option then click "Next".  Step 6 - Open/expand the tree view (click on the plus '+' symbol) until you see the 64 bit version of MySQL (should be 'MySQL Server 5.6.21 - x64'). Move it to Products/Features To Be Installed by clicking on the arrow pointing to the right. This item should now be in the right hand column labeled "Products/Features To Be Installed:" as shown below.
Step 7 - Repeat expanding the tree under 'Applications' and add MySQL Workbench (x64) to the install list on the right had side.
Step 8 - Repeat expanding the tree under 'MySQL Connectors' and add Connector/NET (X64) to the install list on the right had side.
Step 9 - Click "Next" to proceed with the requirement check and install as recommended (using the "Execute" button).
Step 10 - Proceed with the database installation. Click "Next".
Step 10b - Click “Next” to Configure.
Step 11 - Ensure the "Open Firewall port for network access" is chosen as well as "Advanced Configuration". The Advanced Configuration options will show up as additional dialogs as you proceed through the next configuration steps. Click "Next".
Step 12 - Use the default or recommended ‘Authentication Method’ and click “Next”. Then create a strong password. Save this password in a secure location. Your software provider CAN NOT retrieve this password for you. Click "Next".
Recommended: create a root user account with full dba privileges and specify the host as the machine name or IP address that supporting apps on other machines will be able to use to access this database. If you aren't able to do this now - you can do it later in the post-database setup phase before installing Flow.
Step 13 - Ensure the "Start MySQL Server at System Startup" is enabled and click "Next".
Step 14 - Chose which option applies to your configuration:
Use default “Lower Case” table names:
Click "Next". Step 15 - Proceed to install the product. Click "Execute".
Step 16 - Allow the MySQL Workbench to launch so it can be configured. Click "Finish".
Step 17 - Click “Next” to configure:
Step 18 - Click “Finish” and enable or start launch workbench after setup.
Step 19 - Test MySQL. When MySQL Workbench opens, double click the "Local Instance" and enter the strong password created in Step 12. Enable the Save Password in Vault option and click "OK". This will ensure the database is running.
If you have successfully installed MySQL this will now connect to your database.
Post-Install Configuration MySQL UserIf you didn't do this already - create a root user account with full dba privileges and specify the host as the machine name or IP address. The use of the defined IP address or machine name is to allow supporting apps on other machines to use to access this database. In the my.ini file add/update these settings as per below: (try to find them in the file and if they don't exist then add them).
Using RDS
[client] [mysql] [mysqld] character-set-server = utf8mb4 # log_bin_trust… deprecated in version 8.0.34 as well as bin_log_format lower_case_table_names=1
Check the max_connections and see if this value will be sufficient for your environment. Default is 151.
It is recommended that you increase the value of the max_allowed_packet and innodb_log_file_size variables. The default values may be as small as 4MB and 48 MB respectively but this may be insufficient for you use if you use larger media files. For versions 8.0.2 and earlier the max_allowed_packet default was 4MB.
For versions before 8.0.30
For versions after 8.0.30
# MySQL 8 - leave this off because it causes an error in some situations: "Guid should contain 32 digits with 4 dashes" when trying to open the connection Disable Automatic Catalog Update DownloadsWe can disable the automatic catalog updates because they aren't typically necessary for our use. The catalog can be manually updated at any time. (But why bother? well for instances where the DB server is not connected to the internet you and/or the client may see the auto-updater reporting a failure to download the catalog. We don't really need to be handling support calls for this unnecessarily.) This link should provide accurate information. https://dev.mysql.com/doc/mysql-installer/en/mysql-installer-catalog.html However if it is unavailable some of the details have been copied below. MySQL Installer stores a MySQL product catalog. The catalog can be updated either manually or automatically, and the catalog change history is also available. The automatic update is enabled by default. To launch the installer - one way that may be available to you is to use the MySQL Notifier tasktray icon action menu: 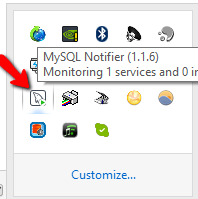 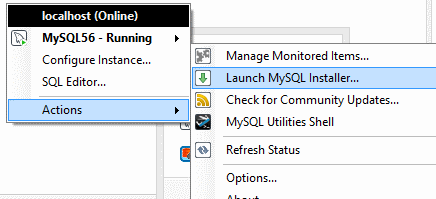 Manual updatesYou can update the MySQL product catalog at any time by clicking Catalog... on the Installer dashboard (bottom right as seen below).  Automatic updates MySQL Installer can automatically update the MySQL product catalog. By default, this feature is enabled to execute each day at 12:00 AM. To configure this feature, click the wrench icon on the Installer dashboard. (seen top-right in image above) The next window configures the Automatic Catalog Update. Enable or disable this feature, and also set the hour.  |


...